Developing plugins
Package plugins in a reusable and sharable way.
Config to plugin
Most of the properties from the defineConfig API can be expressed as a plugin with the definePlugin function.
Note that plugins can also have plugins! This can be a nice way to indicate inter-dependencies in plugins, and build features on top of each other in a portable way.
Example
Given the following Studio configuration, let's move the code related to productionUrl into a plugin:
// before: sanity.config.js
import {defineConfig} from 'sanity'

export default defineConfig({
  // ...

  plugins: [],

  document: {
    productionUrl: async (prev, { document }) => {
      // assume there is 20+ lines of code here
      const useCustomUrl = !!document?.slug?.current;
      if(useCustomUrl) {
					return `https://some-custom-url.xyz/${document.slug.current}`
			}
			return prev
    }
	}
})
Start by extracting the relevant code into a new file and replace defineConfig with definePlugin.
// after: productionUrlPlugin.js
import {definePlugin} from 'sanity'

export const productionUrlPlugin = definePlugin({
  name: 'custom-production-url'

  // code remains exactly the same, but is now contained by the plugin
  document: {
    productionUrl: async (prev, { document }) => {
      // assume there is 20+ lines of code here
      const useCustomUrl = true;
      if(useCustomUrl) {
					return ‘https://some-custom-url.xyz’
			}
			return prev
    }
	}
})
Then import the plugin and add it to the plugins-array in defineConfig:
// after: sanity.config.js
import {defineConfig} from 'sanity'
import {productionUrlPlugin} from './productionUrlPlugin'

export default defineConfig({
  // ...

  // now we have the productionUrl plugin neatly wrapped up in a plugin
  plugins: [productionUrlPlugin()],
})
Studio plugin to package
Some plugins are so useful that you want to use them in multiple studios or share them with everyone. For that, you first need to create an npm package, then publish it to npm.
By organizing your code using definePlugin you are already halfway there! The other part of the equation is all about creating an npm package repository.
There are many ways to go about this, but we highly recommend @sanity/plugin-kit as a way to get started.
Let @sanity/plugin-kit do the work
Opinionated
@sanity/plugin-kit is an opinionated way to create an npm package for Sanity. It aims to be a one-stop-shop for creating a Sanity plugin package. It will handle a lot of the tedium that goes into preparing a package, such as bundling for both commonjs and esm Javascript runtimes. You do not need to use it if you prefer other ways to work with npm package repositories.
Initialize a new package
To create a new plugin package, run the following command in a shell:
npx @sanity/plugin-kit init <plugin-name>
pnpm dlx @sanity/plugin-kit init <plugin-name>
yarn dlx @sanity/plugin-kit init <plugin-name>
bunx @sanity/plugin-kit init <plugin-name>
This will initialize a new plugin package in the current directory, and will prompt for various details that will go into package.json.
At this point, you have a fully functioning Sanity plugin package that can be tested in your studio.
Feel free to confer the manual pages for the init command with npx @sanity/plugin-kit init --help for available options.
Test your plugin in a studio
In your plugin package directory run:
npm run link-watchpnpm run link-watchyarn run link-watchbun run link-watchThis will set up your plugin to build whenever the code changes, and publish the package to a local yalc repository.
Protip
yalc is a replacement for npm link that makes testing plugins locally easier.
In the command log, there should be a note that reads something like this:
# To test this package in another repository directory run:
npx yalc add <sanity-plugin> && npx yalc link <sanity-plugin> && npm install
Copy the command, paste it into your Studio directory shell and run it. This will install the plugin from the local yalc repository, which will be updated whenever the plugin code changes.
You can now import the plugin from your package in sanity.config.js, start the studio and it should appear there. It will look something like this:
//sanity.config.js
import {defineConfig} from 'sanity'

// export name depends on what is exported from index.ts in the plugin
import {myPlugin} from '<sanity-plugin>'

export default defineConfig({
  // ...

  plugins: [myPlugin()],
})
Gotcha
The default plugin implementation created by plugin-kit only logs “hello” in the web-console, so take a look there if you are not seeing any changes.
For more, please confer @sanity/plugin kit testing guidelines.
Add your plugin code
Now you can add your plugin code. Remember to add any dependencies used to package.json
src/index.ts is the entry point to the plugin and the place where definePlugin is configured.
Changes you make will be reloaded in the studio as long as you have the link-watch command running.
Publish a package
After developing and testing a plugin, it is time to publish it to npm.
In a package using @sanity/plugin-kit, the prepublishOnly script will ensure that the package is validated and builds according to plugin-kit expectations. These checks are in place to prevent an array of common errors from slipping through when publishing.
The manual way
If you are comfortable with publishing from your local development environment, in your package directory run:
npm run publishpnpm run publishyarn run publishbun run publishThis will build and publish your package to npm. It will ask for a one-time code if you have 2-factor authentication enabled on your npm account (you should).
When manually publishing like this, you are responsible for bumping the version field in package.json manually between releases. You also have to manually tag and create a release on Github if you want that sort of thing.
Gotcha
Scoped packages (package name starts with @ ie: @orgOrNpmUser/package) are private by default. This implies:
- Only users with access to the organization (or user) can download the package.
- You have to be a paid npm user to be allowed to publish.
To make your package public (which will circumvent the above limitations), add the following to your package.json:
"publishConfig": { "access": "public" }
The opinionated semantic-release way
Opinionated
This section uses a @sanity/plugin-kit preset template to do most of the work. It puts certain guardrails on the development process to lower the chance of a faulty publish event. Feel free to make changes to the setup, look to it for inspiration or completely disregard it.
If you want to do automated releases using Github actions, @sanity/plugin-kit has this covered via the injectable semver-workflow preset.
Consider using this preset if you want the following:
- husky for pre-commit hooks to ensure that:
- all commits follow conventional-commits format
- all files in a commit pass eslint
- semantic-release automation for npm publish
- GitHub workflow (Action) that does continuous integration and has publish-on-demand support
That said, all of these can be opted-out of by simply reverting the changes you don’t care for.
Before continuing, ensure that your package has no local changes, so it is easy to check what changes are applied to your code.
In your plugin directory run:
npx @sanity/plugin-kit inject --preset-only --preset semver-workflow && npm i
This command will configure the plugin package with files and dependencies that accommodate an automated plugin workflow on GitHub.
Keep in mind that this setup is tailored to the needs of the Ecosystem team at Sanity. Feel free to modify any and all files injected by the preset, or use it as a basis for creating your own workflow.
For more on this, refer to the semver-workflow preset docs.
Submit your plugin to the exchange
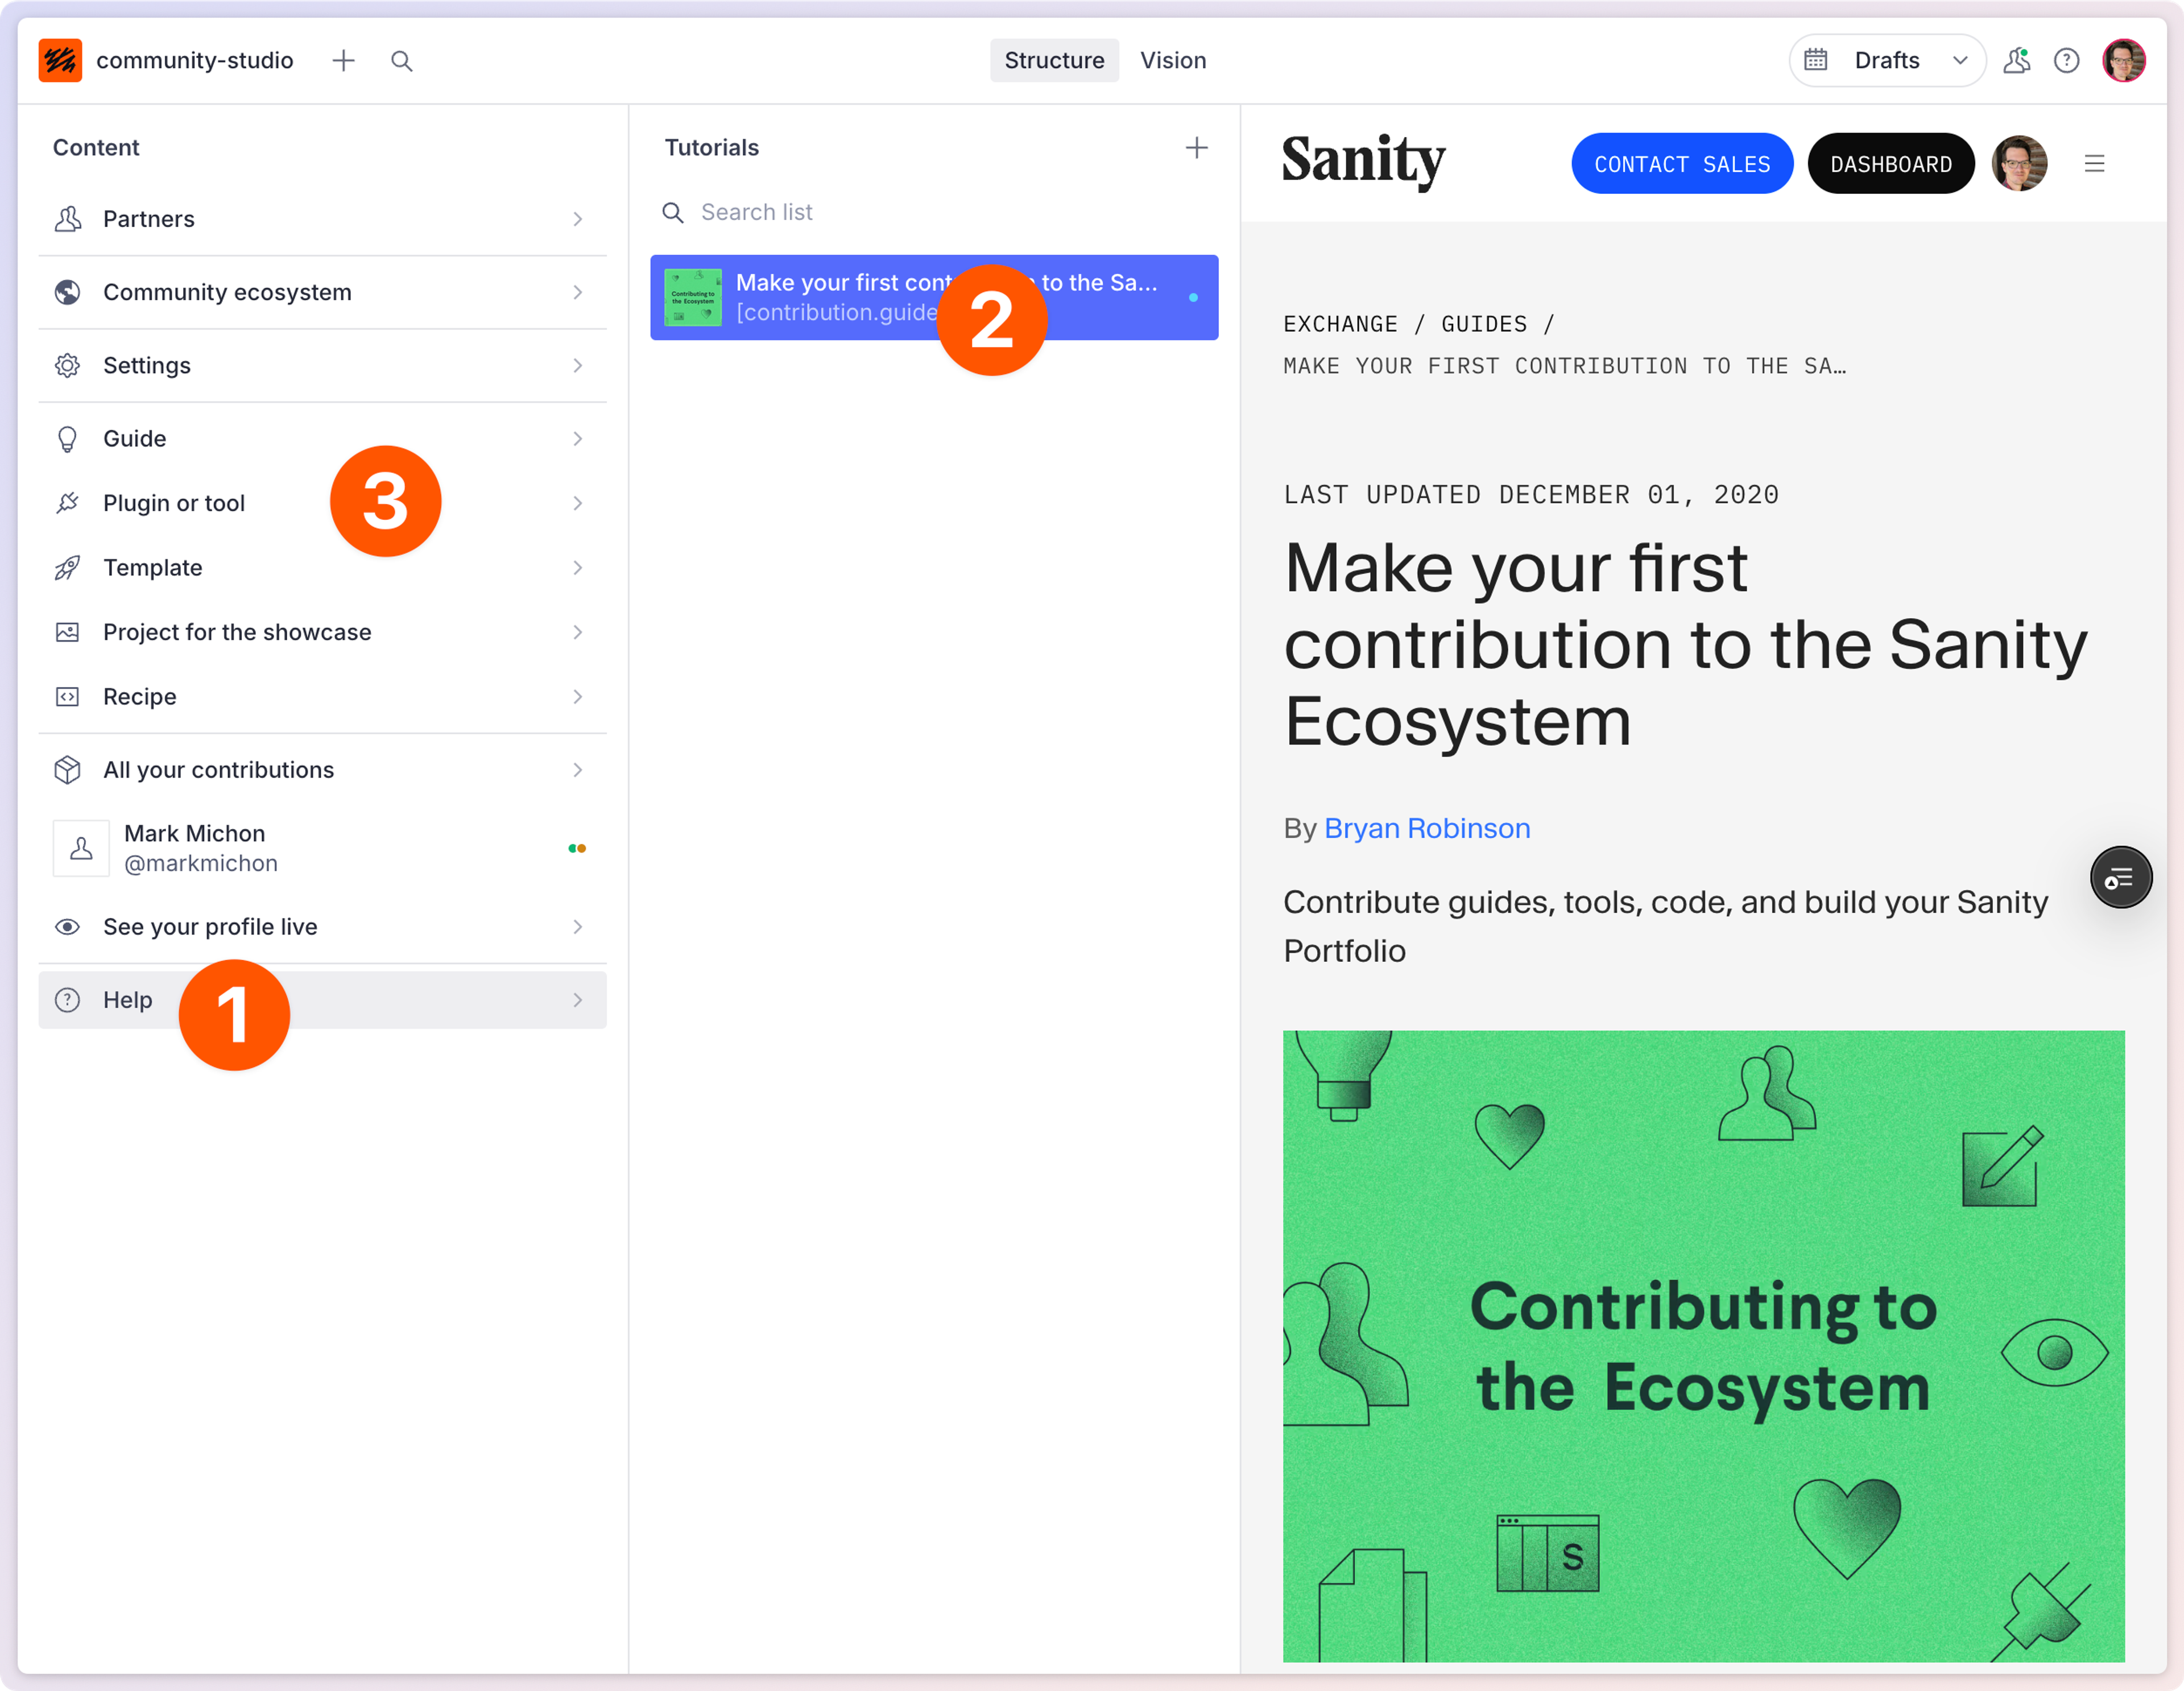
If your plugin is intended for external use, you can submit it to the Sanity Exchange. The exchange is powered by a Sanity Studio, and you can log in with an existing Sanity account by visiting community.sanity.tools.
Once logged in, you're presented with the community studio. To get started:
- Select "Help".
- Select the "Make your first contribution" guide, and read through it.
- Select the category of contribution you'd like to make, and follow the in-studio descriptions to fill in the contents.
Was this page helpful?