Displaying images
For most web applications, the majority of data sent over the network will be for assets – such as images and videos. Your end users want your application to load as fast as possible. It's also well-known that faster-loading sites directly improve conversion rates.
Optimizing web applications for performance is an intense topic. This lesson aims to give essential guidance for serving images using utilities provided by Sanity and Next.js.
This is the last time we'll remind you to create a branch when working on new features. We trust you'll get in the habit from now on.
git checkout -b add-imagesAssets uploaded to the Content Lake are available on the Sanity CDN to render on your front end. Parameters can be added to an image URL to determine its size, cropping, file type, and more.
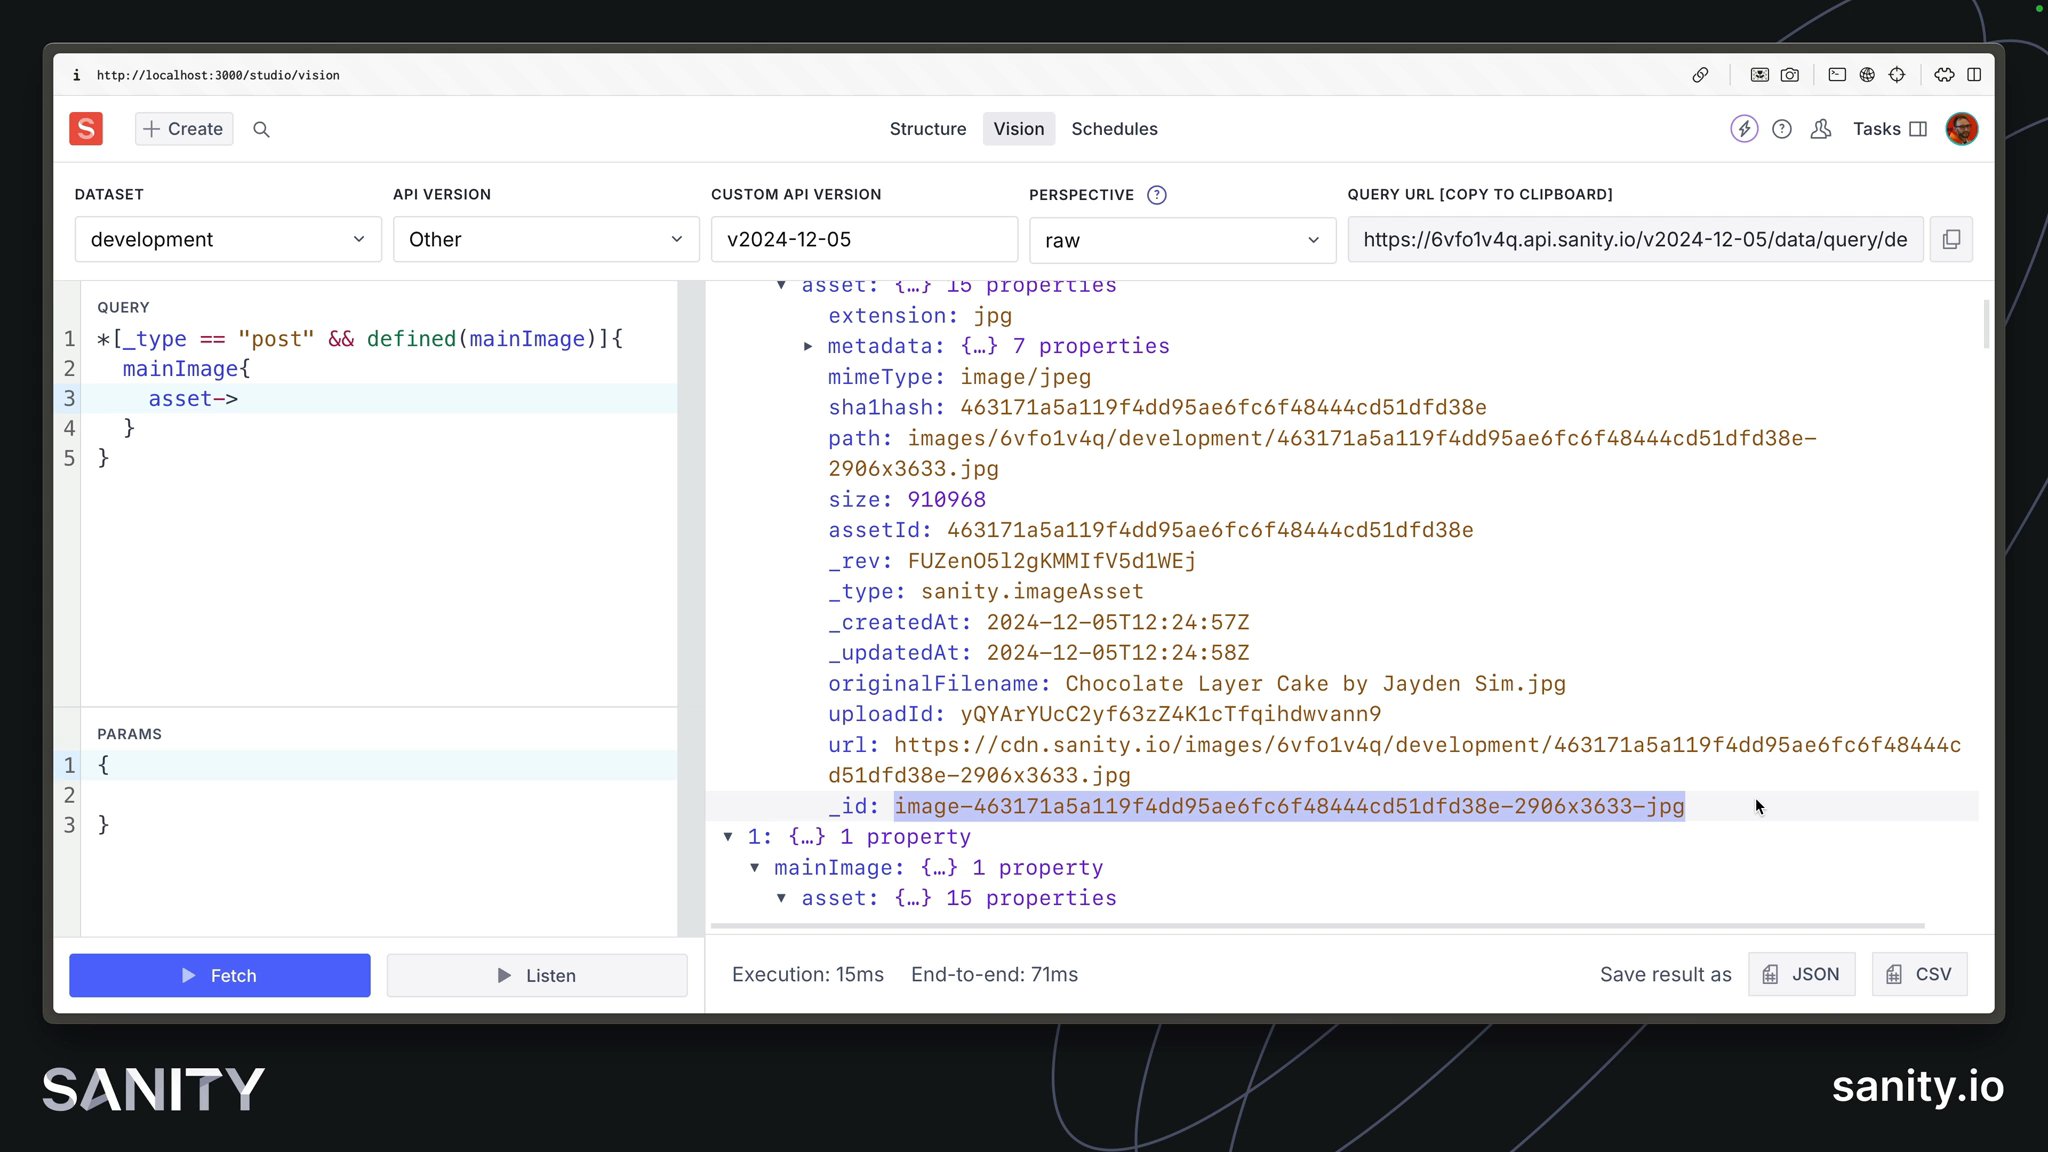
When you upload an image to the Content Lake, an additional document is created to represent that asset, along with details of its metadata and more.
Uploading an image from within a document creates a reference to that asset document.
post document and publishNow you can query for a single post-type document with an image and return just the image field.
*[_type == "post" && defined(mainImage)][0]{ mainImage}The response should contain a _ref inside the asset attribute.
There may also be crop information and an alt string field.
{ "mainImage": { "_type": "image", "asset": { "_ref": "image-a9302e7a5555e209623897eeec703c39499db23e-5785x3857-jpg", "_type": "reference" } }}The image field schema type is similar to the object type in that it can have additional fields. One is already configured for you for "alternative text."
"Alt" text is used as a fallback when the image is not yet loaded and helps describe the image for screen readers. It is an essential addition to the accessibility of your web application.
alt attribute.alt text in this document. The popular Media browser plugin writes alt text to the asset document.Including alt text for images is important enough that your Studio schema should enforce it as a requirement. Use a custom validation rule to require the alt field when the asset field has a value.
alt text fielddefineField({ name: 'alt', type: 'string', title: 'Alternative text', validation: rule => rule.custom((value, context) => { const parent = context?.parent as {asset?: {_ref?: string}}
return !value && parent?.asset?._ref ? 'Alt text is required when an image is present' : true }),})Using the GROQ operator to resolve a reference (->) you can return everything from the asset attribute.
*[_type == "post" && defined(mainImage)][0]{ mainImage { ..., asset-> }}You should now have a much larger response, and within it, a url attribute with the full path to the original image.
This is useful, however:
- It would be slow for end-users and wasteful of bandwidth to serve a full-size image for every request.
- Because Sanity image URLs follow a strict convention, the
@sanity/image-urlpackage allows you to create image URL's without resolving references – using just the project ID, dataset and asset ID.
@sanity/asset-utils is another handy library for working with Sanity Assets using just their IDNext, you'll update the front-end to display the "main image" with a dynamically generated URL.
Images served from Sanity's CDN can be resized and delivered in different qualities and formats, all by appending specific parameters to the URL. Serving images closer to the size they are viewed and in the most efficient format is the best way to reduce bandwidth and loading times.
When you ran sanity init with the Next.js template, a file was created for you with the image builder preconfigured with your project ID and dataset name:
import createImageUrlBuilder from '@sanity/image-url'import { SanityImageSource } from "@sanity/image-url/lib/types/types";
import { dataset, projectId } from '../env'
// https://www.sanity.io/docs/image-urlconst builder = createImageUrlBuilder({ projectId, dataset })
export const urlFor = (source: SanityImageSource) => {  return builder.image(source)}
This urlFor function will accept a Sanity image – as a full asset document, or even just the ID as a string – and return a method for you to generate a full URL.
import { notFound } from "next/navigation";import Link from "next/link";import { sanityFetch } from "@/sanity/lib/live";import { POST_QUERY } from "@/sanity/lib/queries";import { urlFor } from "@/sanity/lib/image";
export default async function Page({ params,}: { params: Promise<{ slug: string }>;}) { const { data: post } = await sanityFetch({ query: POST_QUERY, params: await params, });
if (!post) { notFound(); }
return ( <main className="container mx-auto grid grid-cols-1 gap-6 py-12"> {post?.mainImage ? ( <img className="w-full aspect-[800/300]" src={urlFor(post.mainImage) .width(800) .height(300) .quality(80) .auto("format") .url()} alt={post?.mainImage?.alt || ""} width="800" height="300" /> ) : null} <h1 className="text-4xl font-bold text-balance">{post?.title}</h1> <hr /> <Link href="/posts">← Return to index</Link> </main> );}The post to which you uploaded an image and published the changes should now render the image from Sanity.
Take note of the methods passed along to urlFor, which created a unique URL to the image which was cropped to 800x300 pixels, a quality of 80%, in the most efficient file format that the current browser can display, and finally returned a string to the complete URL.
@sanity/image-url for the full list of available methods and their uses.If you inspect the URL of the image, you should see a result like this:
https://cdn.sanity.io/images/mml9n8hq/production/a9302e7a5555e209623897eeec703c39499db23e-5785x3857.jpg?rect=0,845,5785,2169&w=800&h=300&q=80&auto=formatWhile the front end is set to determine the size of the image, your content creators may want to draw focus to a specific region. In other CMSes, this typically means uploading several versions of the same image at different crop sizes. With Sanity, you can store the crop and focal intentions as data.
Within your Sanity Studio post schema type, the "main image" field contains an option of hotspot set to true.
defineField({ name: 'mainImage', type: 'image', options: { hotspot: true, }, // ... other settings}),This enables the crop and hotspot tool inside Sanity Studio, allowing creators to set the bounds of the image that should be displayed and, when cropped, which area it should focus on.
Because the crop and hotspot values were returned from the GROQ query for the asset, they were sent along when creating the URL.
Now, your image should look somewhat different on the front end, with its best efforts made to utilize the crop area and focal point.
You've now successfully uploaded, editorialized, and displayed an image from Sanity on the front end that is performant and accessible. However, your IDE may be showing a warning that the use of the <img> element may produce sub-par performance. There is some logic to this, as the rendering of an image can be further enhanced for performance than what you currently have.
Next.js prefers you use their Image component, we can switch to that now.
Fast image rendering is crucial to fast web applications, so any improvements that can be made in this area are beneficial. Next.js ships an Image component for this reason.
The Next.js documentation mentions that you'll need to update the Next.js config to accept the Sanity CDN URL to use the Image component with remote images.
next.config.ts to include the Sanity CDN URLimport type { NextConfig } from "next";
const nextConfig: NextConfig = { images: { remotePatterns: [ { protocol: "https", hostname: "cdn.sanity.io", }, ], },};
export default nextConfig;Now update your individual post route to use the imported Next.js component <Image /> instead of the HTML <img>. It is important to note that this component requires a specified height and width.
Image from next/image:import { notFound } from "next/navigation";import Image from "next/image";import Link from "next/link";import { sanityFetch } from "@/sanity/lib/live";import { POST_QUERY } from "@/sanity/lib/queries";import { urlFor } from "@/sanity/lib/image";
export default async function Page({ params,}: { params: Promise<{ slug: string }>;}) { const { data: post } = await sanityFetch({ query: POST_QUERY, params: await params, });
if (!post) { notFound(); }
return ( <main className="container mx-auto grid grid-cols-1 gap-6 p-12"> {post?.mainImage ? ( <Image className="w-full aspect-[800/300]" src={urlFor(post.mainImage) .width(800) .height(300) .quality(80) .auto("format") .url()} alt={post?.mainImage?.alt || ""} width="800" height="300" /> ) : null} <h1 className="text-4xl font-bold text-balance">{post?.title}</h1> <hr /> <Link href="/posts">← Return to index</Link> </main> );}Once the page reloads, open the web inspector and look at the generated <img> element. You will notice it has several more attributes than before. The loading and decoding attributes, in particular, are subtle performance improvements.
<img alt="Chocolate layer cake" loading="lazy" width="800" height="300" decoding="async" data-nimg="1" class="w-full aspect-[800/300]" style="color:transparent" srcset="/_next/image?url=https...">You're now retrieving images from Sanity's CDN with the best possible front end performance thanks to the Next.js Image component.
The next building block of web applications to render is rich text and block content. Let's get acquainted with Portable Text in the next lesson.