Create a recycling bin for logging and restoring deleted documents
Help you editors restore deleted documents in a dataset using a webhook and a singleton bin document type.
This developer guide was contributed by Saskia Bobinska (Senior Support Engineer) and Benjamin Weinberger (Support Engineer at Sanity.io).
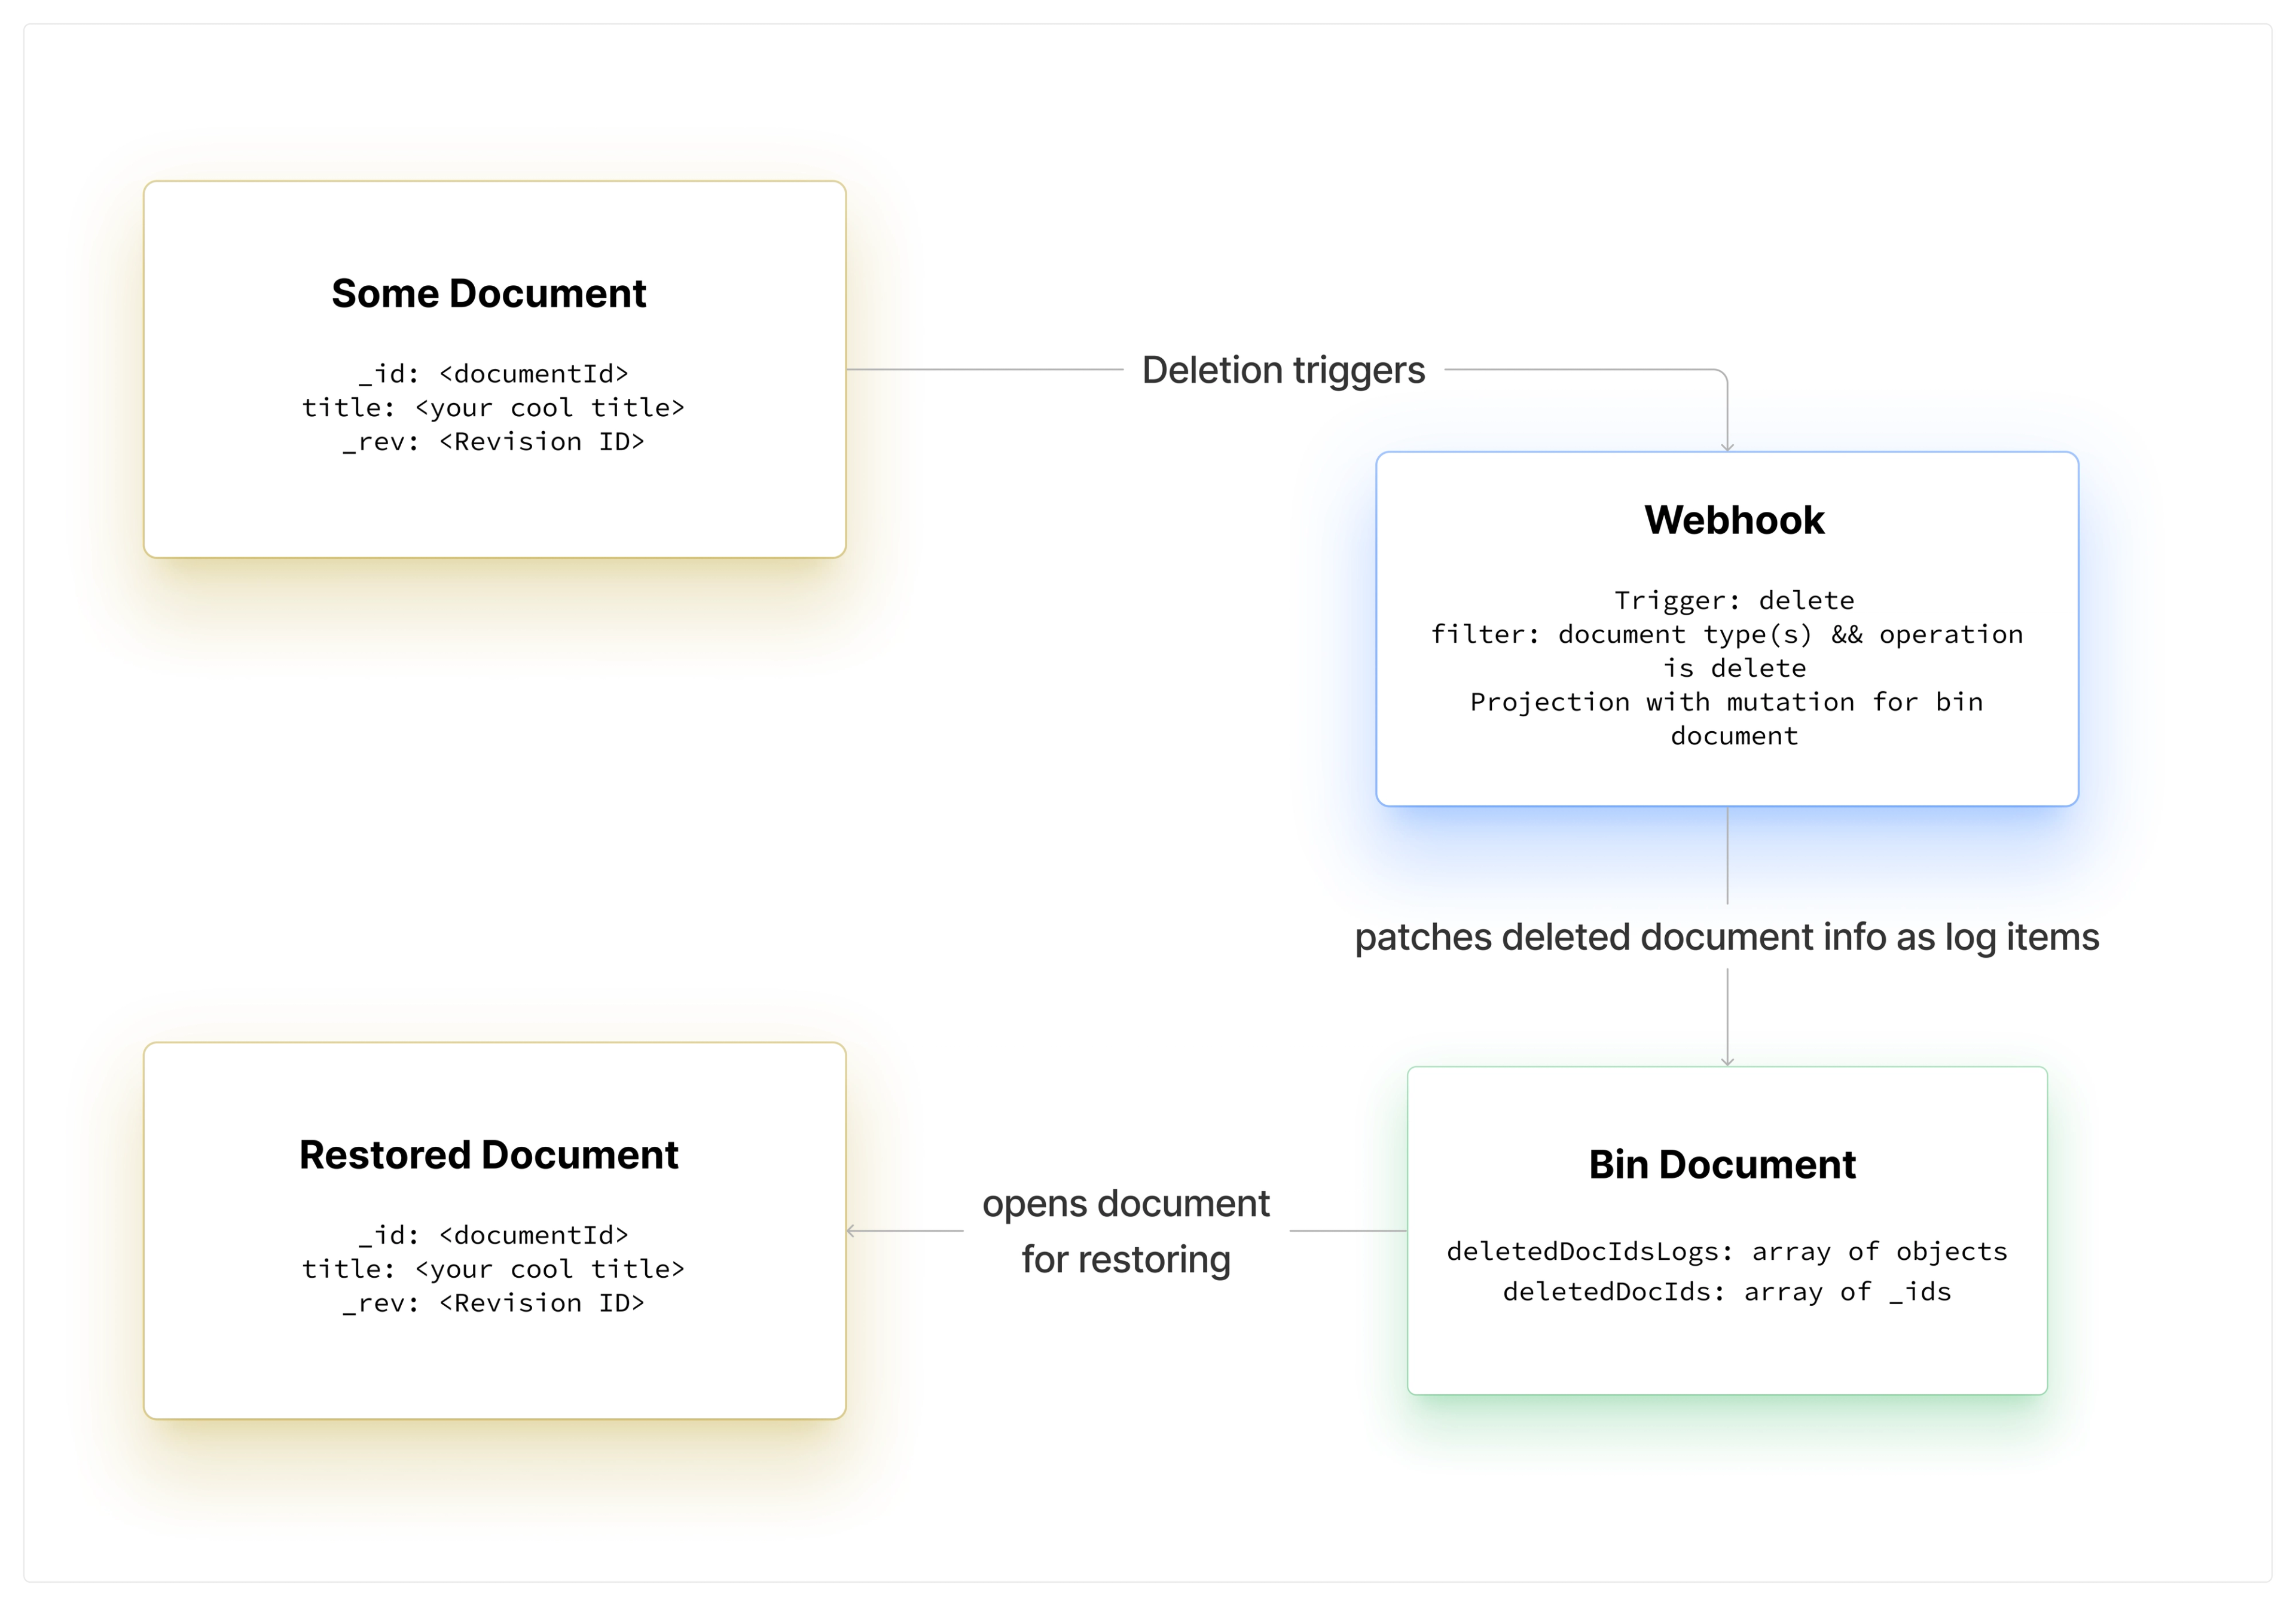
Set up a custom 'recycle bin' logic in your Studio, enabling users to restore deleted documents of a certain type with 2 clicks, using a webhook and a singleton document type, to which we add some custom components using the Component API and the Sanity UI.
In this guide, you will:
- Create a singleton document type and create your singleton document using the CLI.
ThedeletedDocs.bintype will have adeletedDocLogsarray withlogitems (objects) where we store thedocumentId(string),type(string),deletedAt(datetime) anddocumentTitle(string) of each deleted document. There can also be a more straightforward (optional) arraydeletedDocIdswith just the_idstings. - Set up a webhook which will be triggered upon deletion of a subset of documents. This webhook will hit the mutation endpoint and patch the deleted document information we need to the logs of the bin singleton document.
- Create a custom item component for the
logitems, including the intent button for opening the deleted documents in question. - Create a custom input component for the
deletedDocLogsarray, which will remove all document logs, which have been restored already.
In this guide, we will use TypeScript to make the code more reliable, but you can use JavaScript if you prefer. If you don't know how to do this, you can ask in our Slack community for help!
You can find the whole code for the solution here but make sure you still follow step 3.
Background: Restoring deleted Documents using the _id
When you delete a document, you can restore it using the unique document _id (either via the history API, or the Studio). In the Studio it is as simple as opening up the document in the structure using the default folder for that particular document type and adding the ID to the url:
https://<domain>/studio/default/structure/<document type name>;<deleted document _id>.
Although this trick is helpful, you would still need the know the deleted document _id.
Try this by deleting a document and just using the Go back button in your browser, which will reopen the document you just deleted. Below the form header, you will now see a banner looking like this:
Intent routing in the Studio
Internally Sanity sometimes uses an Intent Link to navigate to a document in the structure using intent (which can either be edit or create). We can use the same edit intent to open deleted documents and use the restore functionality automatically proposed for any deleted document opened in the Studio.
Although IntentLink is a stable and public part of our API (reference documentation), the IntentButton is not.
We decided to use the IntentButton, because it is what we use internally, but this will mean that things might change, and there is no documentation you can check.
If you are uncomfortable with this, you can instead use a Button component from the Sanity UI and wrap it with an IntentLink.
Workflow

Step 1: Singleton document schema
Create a document type called deletedDocs.bin in your schema folder (in our case we have an additional subfolder called singletons) and add it to your schema as a singleton:
// schemas/singletons/deletedDocBinDocument.ts
import { TrashIcon } from "@sanity/icons";
import { defineArrayMember, defineField, defineType } from "sanity";

export const deletedDocBinDocument = defineType({
  // We use a dot in the _id to make sure this is a private document which cannot be read unless you are authenticated. We chose to do the same in the type name as a personal naming choice.
  name: "deletedDocs.bin",
  title: "Bin: Deleted Document Log",
  type: "document",
  icon: TrashIcon,
  // we want to skip a draft version of this document, so we set this 👇
  liveEdit: true,
  // Fieldset to "hide away" the deletedDocIds array from view unless we need them
  fieldsets: [
    {
      name: "deletedDocIdLogs",
      title: "All Deleted Doc Id Logs",
      options: {
        collapsible: true,
        collapsed: true,
      },
    },
  ],
  fields: [
    // * Main log for restoring documents
    defineField({
      name: "deletedDocLogs",
      title: "Deleted Doc Logs",
      type: "array",
      readOnly: true,
      options: {
        sortable: false,
      },
      description:
        "Log of deleted documents. All items have the revision ID as the _key value and might have already been restored again.",
      of: [
        defineArrayMember({
          type: "object",
          name: "log",
          title: "Log",
          readOnly: true,
          fields: [
            defineField({
              name: "docId",
              title: "Doc Id",
              type: "string",
              validation: (Rule) => Rule.required(),
            }),
            defineField({
              name: "deletedAt",
              title: "Deleted At",
              type: "datetime",
              validation: (Rule) => Rule.required(),
            }),
            defineField({
              name: "type",
              title: "Type",
              type: "string",
            }),
            defineField({
              name: "documentTitle",
              title: "Document Title",
              type: "string",
              validation: (Rule) => Rule.required(),
            }),
            defineField({
              name: 'deletedBy',
              title: 'Deleted By',
              type: 'string',
            }),
          ],
        }),
      ],
    }),
    // Backup of all deleted doc ids -> optional and not used but can be useful to track
    defineField({
      name: "deletedDocIds",
      title: "Deleted Doc Ids",
      type: "array",
      readOnly: true,
      options: {
        sortable: false,
      },
      fieldset: "deletedDocIdLogs",
      of: [
        defineArrayMember({
          name: "deletedDocId",
          type: "string",
          readOnly: true,
          validation: (Rule) => Rule.required(),
        }),
      ],
    }),
    // title for the document (will be set during creation via CLI)
    defineField({
      name: "title",
      title: "Title",
      type: "string",
      hidden: true,
    }),
  ],
});
We set all arrays to readOnly and also hide away the title field since we will set the title in the next step and only need it for a better UI.
In addition we disabled sorting for arrays to have a cleaner look.
Why are all array item fields required?
When the fields are set to required, you can find errors in the data via the validation CLI command. Since things can always go wrong, adding validation rules can make your debugging life much easier!
Custom TypeScript interface for the deletedDocLogs items
As we always want to make the TypeScript Dogs happy, we need to extend the Sanity ObjectItem with our data keys.
Add the custom interface to the schema definition or a separate types file.
// import ObjectItem from sanity

export interface LogItem extends ObjectItem {
  docId: string
  deletedAt: string
  type: string
  documentTitle: string | 'Unknown 🥲'
  deletedBy?: string
}
Create a singleton document via the CLI
For the next step, we will create a private document by using a dot in _id. Our personal choice was to use the same logic in the _type name, but you can use a name without a dot if you want to.
At the root of your project, create a newBinSingleton.json and add this data to it:
{
  "_id": "deletedDocs.bin",
  "_type": "deletedDocs.bin",
  // feel free to add your own title
  "title": "Bin: Deleted Document Logs"
}
Next, you need to open your terminal in the root of the project folder and create a document via the CLI:
$ sanity documents create newBinSingleton.json

// or if you dont have @sanity/cli installed globally
$ npx sanity documents create newBinSingleton.json
🥳 Now, there should be a singleton document visible in your structure.

Step 2: Adding custom components
Now we are ready to give our arrays some bling and add custom input components 💅.
We will:
- Remove the Add Item buttons from the arrays (go to section)
- Add custom
DeletedDocIdInputComponent.tsx: input component fordeletedDocIdsitemps (go to section)DeletionLogItemComponent.tsx: item components forlogobjects in thedeletedDocLogsarray (go to section)DeletionLogInputComponent.tsx: input component to thedeletedDocLogsarray for cleaning up the logs (go to section)
Remove the Add Item buttons from arrays
Because we don't need a UI for adding new items to any of our arrays, we will not only set them to readOnly: true, but also remove the buttons under the inputs by adding custom input components.
In those components, we define that we want to render out the default inputs (by using props.renderDefault from the Component API) minus the arrayFunctions (which will render out the button to add new items to arrays).
// add these component snippets to your arrays
components: {
  /* Remove the `Add Item` button below the Array input  */
  input: (props) =>
    props.renderDefault({ ...props, arrayFunctions: () => null }),
},
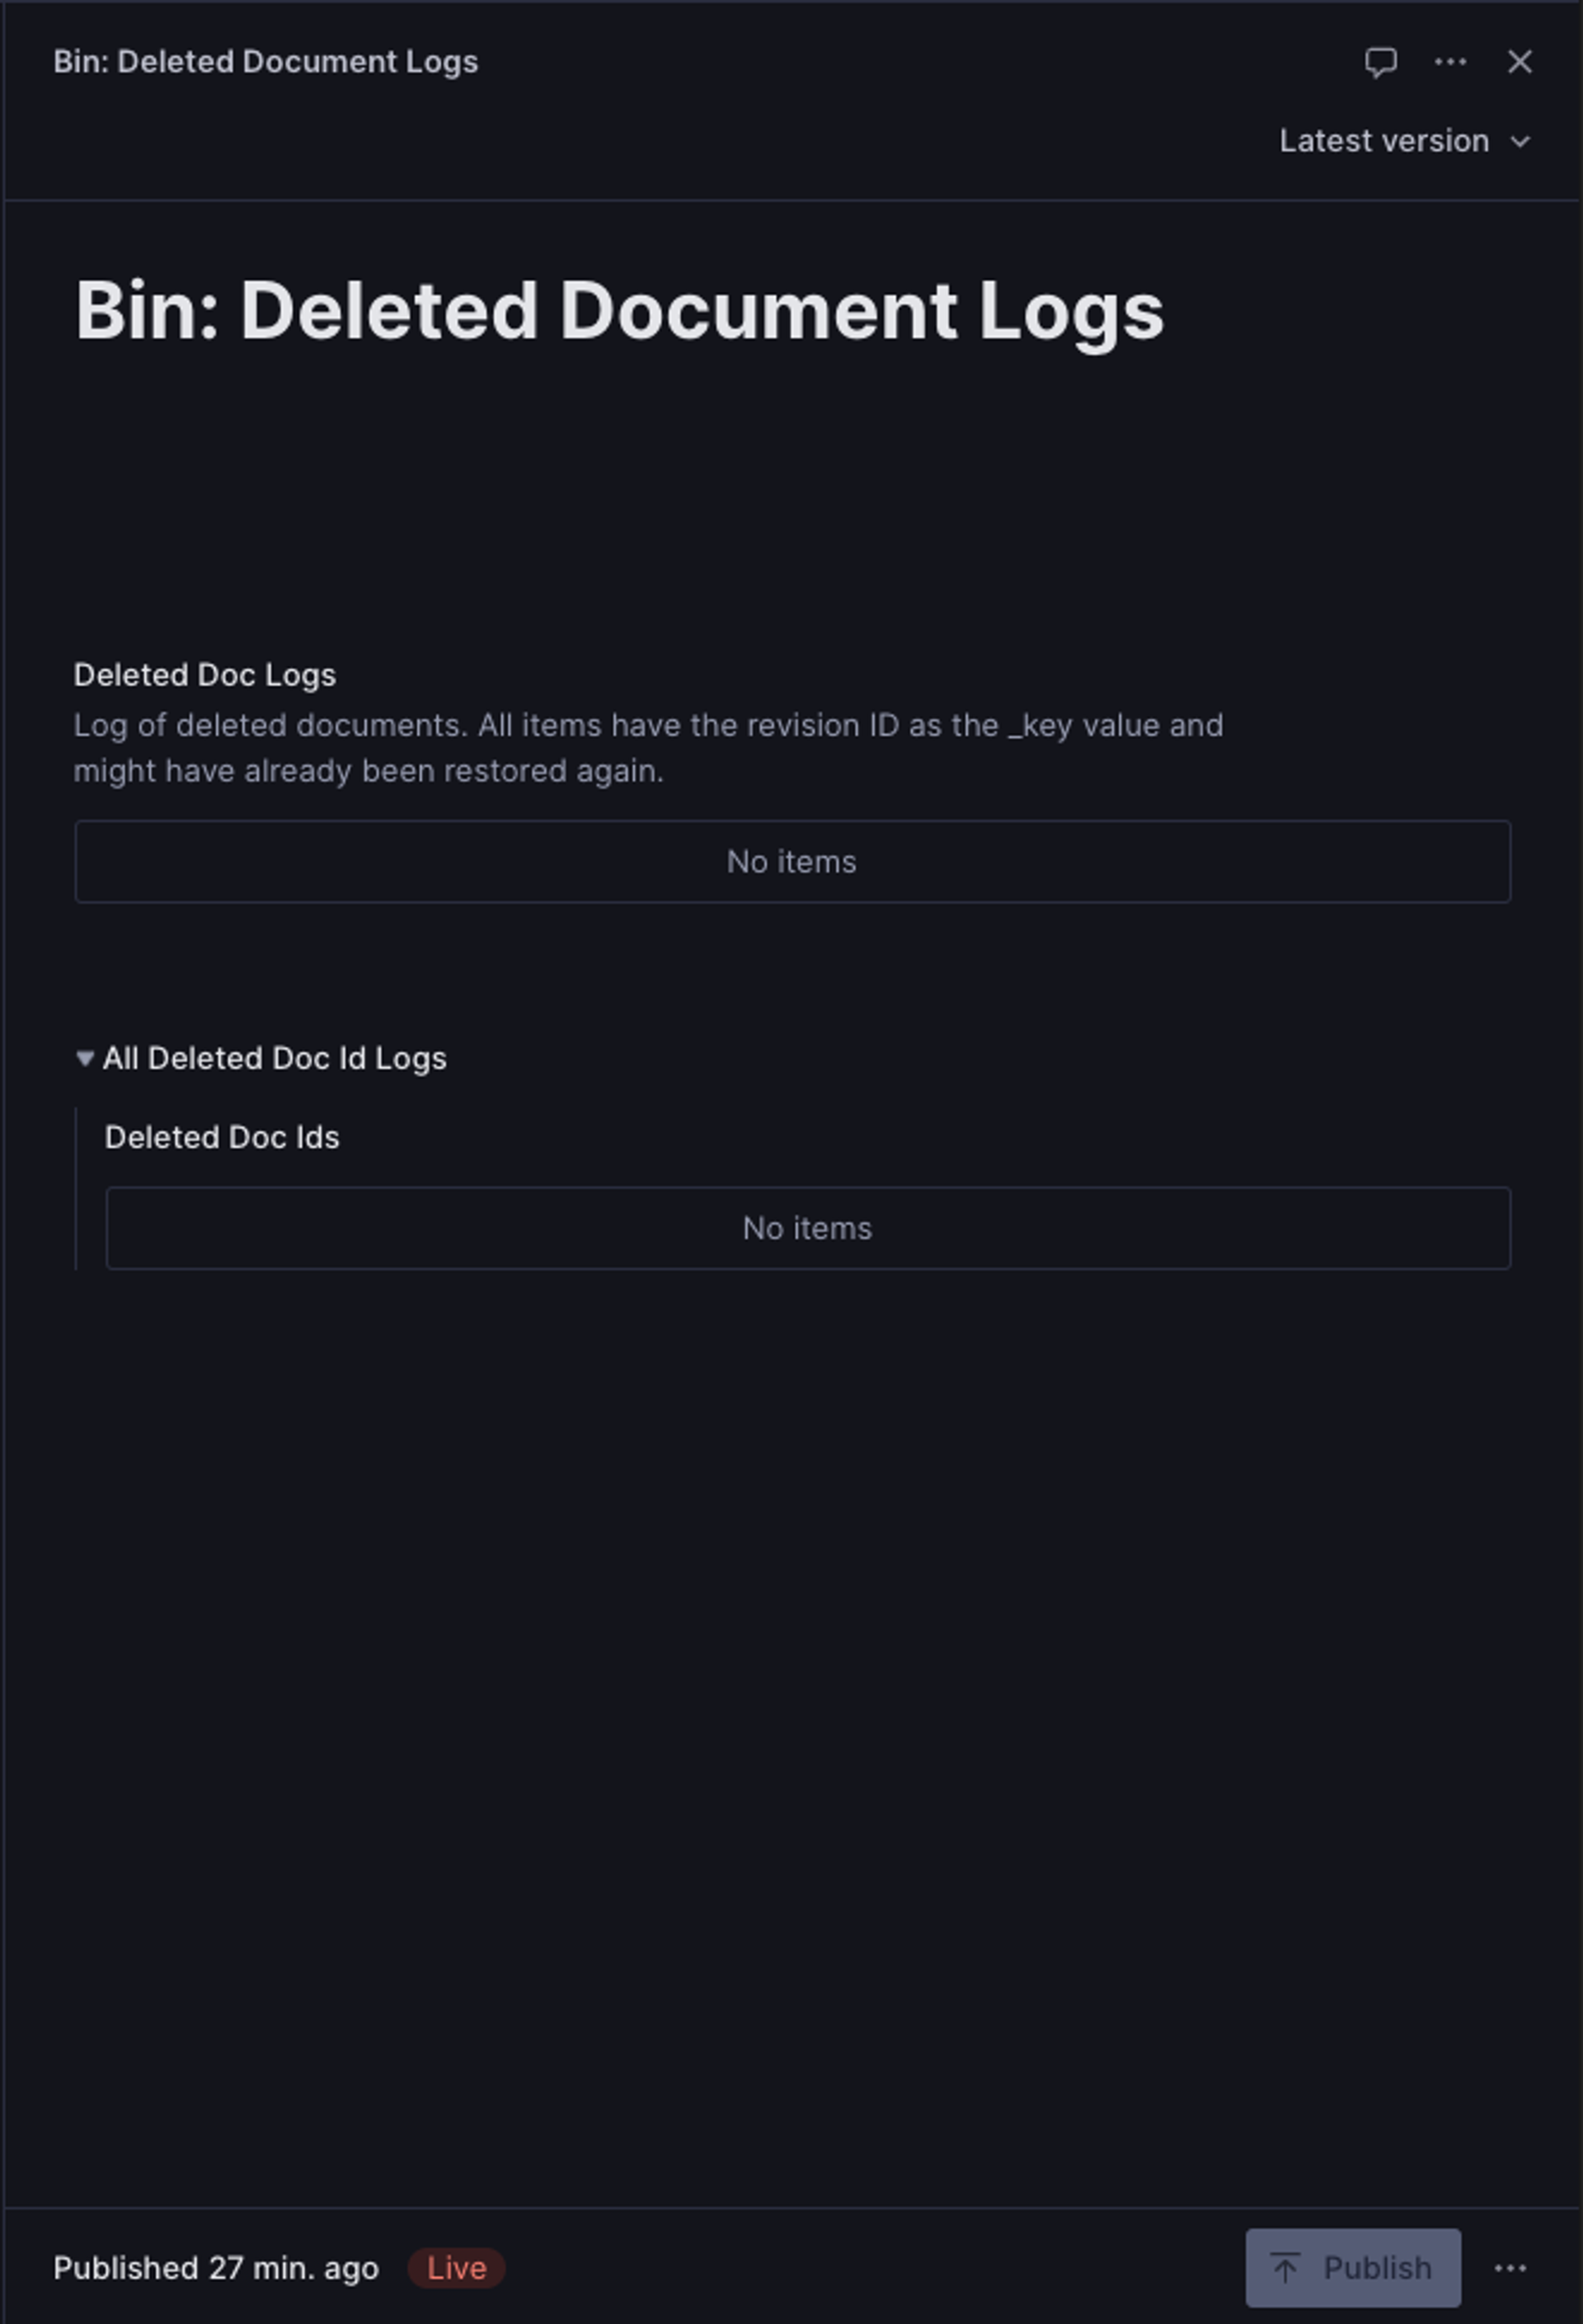
Your bin document should look like this now:

Custom input component for the simple (optional) deletedDocIds array items
Add a file DeletedDocIdInputComponent.tsx for the simple string items and add the component to your deletedDocIds array member string field.
// in DeletedDocIdInputComponent.tsx
import { Card, Flex, Text } from '@sanity/ui'
import { ComponentType } from 'react'
import { StringInputProps } from 'sanity'

/** ### String Input Component for `deletedDocIds` items
 */
export const DeletedDocIdInputComponent: ComponentType<StringInputProps> = (
  props,
) => {
  return (
    <Flex
      justify={'space-between'}
      align={'center'}
      gap={2}
      paddingLeft={2}
      paddingY={2}
    >
      <Card>
        <Text>{props.value}</Text>
      </Card>
    </Flex>
  )
}
Then add the custom input component to the deletedDocIds array by adding this snippet to the deletedDocId array member:
// in the deletedDocIds field definition
defineArrayMember({
  name: "deletedDocId",
  type: "string",
  readOnly: true,
  components: {
    input: DeletedDocIdInputComponent,
  }
}),
Custom item component for the log objects (deletedDocLogs array members)
Now that we have the easy part behind us, we can dive deeper into the restoring functionality itself.
First, we need to create a file DeletionLogItemComponent.tsx and override the default preview since we do not want to use the array for editing the log object values, but only display each deletion and add a button which will lead us to the deleted document in the structure, where we can restore it.
// DeletionLogItemComponent.tsx

import { SanityUser } from '@sanity/client'
import { RestoreIcon } from '@sanity/icons'
import { Card, Flex, Stack, Text } from '@sanity/ui'
import { ComponentType, useEffect, useState } from 'react'
import { IntentButton, ObjectItemProps, useClient } from 'sanity'
import { apiVersion } from '../../lib/api'
import { LogItem } from '../../schemaTypes/singletons/deletedDocBinDocument'
import User from './User'

/** ### Array Item Component for each log entry
 *
 * with Intent Button to open the document and restore it
 */
export const DeletionLogItemComponent: ComponentType<ObjectItemProps<LogItem>> = async (props) => {
  // * Get the value from the props
  const value = props.value
  // * Set up user client to get the user name of the user who deleted the document
  const client = useClient({ apiVersion }).withConfig({ withCredentials: true })
  const [user, setUser] = useState<SanityUser | undefined>()

  useEffect(() => {
    // * Get the user name of the user who deleted the document
    value.deletedBy &&
      client.users
        .getById(value.deletedBy)
        .then((user) => {
          setUser(user)
        })
        .catch((error) => {
          console.error('Error fetching user:', error)
        })
  }, [])

  // * Format the date to be nice and universal
  const date = new Date(value.deletedAt)
  const months = [
    'January',
    'February',
    'March',
    'April',
    'May',
    'June',
    'July',
    'August',
    'September',
    'October',
    'November',
    'December',
  ]
  const formattedDate = `${date.getDate()}.${months[date.getMonth()]} ${date.getFullYear()}`

  return (
    /* only display a border top, if its not the first one 💅 */
    <Card borderTop={props.index > 0 ? true : false}>
      {/*
       * * * Flex container for "custom" item preview and Intent Button */}
      <Flex justify={'space-between'} align={'center'} gap={2} paddingX={4} paddingY={4}>
        {/*
         * * * Custom item preview with the document title, type and date */}
        <Stack space={3}>
          <Text weight="semibold">{value.documentTitle}</Text>

          <Text muted size={1}>
            Type: {value.type}
          </Text>

          <Text muted size={1}>
            Deleted: {formattedDate}
          </Text>

          {user && <User {...user} />}

          <Text muted size={0}>
            ID: {value.docId}, Revision: {value._key as string}
          </Text>
        </Stack>
        {/*
         * * * Intent Button */}
        {value.docId && (
          <IntentButton
            icon={RestoreIcon}
            tone={'positive'}
            mode="ghost"
            intent="edit"
            params={{
              type: value.type,
              id: value.docId,
              revision: value._key,
            }}
            text="Open to restore"
            tooltipProps={{
              placement: 'top',
              content: 'You can restore this document after opening it',
            }}
          />
        )}
      </Flex>
    </Card>
  )
}
With this item component in our pockets, we still have to add it to our log object array members:
// Add this to your `log` object, in your `deletedDocLogs` array
components: {
  item: DeletionLogItemComponent,
},
Clean up button for the deletedDocLogs array
Since the deletedDocLogs can get very long, and we do not need to keep already restored document logs, we can add a useEffect that will check, if a document _id exists (again) and remove those items from the array.
Create a file DeletionLogInputComponent.tsx and add the input component to the deletedDocLogs array:
// DeletionLogInputComponent.tsx

import { Stack } from '@sanity/ui'
import groq from 'groq'
import { ComponentType, useEffect, useState } from 'react'
import { ArrayOfObjectsInputProps, useClient, useFormValue } from 'sanity'

import { apiVersion } from '../../lib/api'
import { LogItem } from '../../schemaTypes/singletons/deletedDocBinDocument'

/** ### Array Input Component with automatic clean up of the log
 *
 * removes restored documents from the logs array
 */
export const DeletionLogInputComponent: ComponentType<ArrayOfObjectsInputProps> = (props) => {
  // * Get the client
  const client = useClient({ apiVersion }).withConfig({
    perspective: 'drafts',
  })

  // * Get Ids and filter unique values
  /** Ids from `props.value` which are also filtered to only return unique IDs */
  const ids = (props.value as LogItem[] | undefined)
    ?.map((item) => item.docId)
    .filter((value, index, self) => self.indexOf(value) === index)

  // * Get the document ID
  /** ID of current `deletedDocIdsDocument` */
  const documentID = useFormValue(['_id']) as string

  // * Set the logs state which will be set by a query
  // that fetches all document ids that are in the logs and check if they exist
  const [logs, setLogs] = useState<string[]>([])
  const query = groq`*[_id in $docIds]._id`
  const params = { docIds: ids }

  // * Create an array of items to unset for documents that were restored
  const itemsToUnset = logs?.map((item) => `deletedDocLogs[docId == "${item}"]`)

  // * This will clean up the logs array by removing the documents that were restored
  // a unaltered log of all published documents that were deleted at some point are in the `deletedDocIds` array
  useEffect(() => {
    // * Run the function only when there is a value and a documentID
    props.value &&
      documentID &&
      client
        .fetch(query, params)
        .then((res) => {
          setLogs(res)
          res.length > 0 &&
            console.log(
              `The log items with the following IDs were restored and are removed from the array: ${res.join(', ')}`,
            )
        })
        .catch((err) => {
          console.error(err.message)
        })
    logs.length > 0 && client.patch(documentID).unset(itemsToUnset).commit().catch(console.error)
  }, [props.value, documentID])

  return (
    <>
      <Stack space={4}>
        {/* Remove the Add Item button below the Array input */}
        {props.renderDefault({ ...props, arrayFunctions: () => null })}
      </Stack>
    </>
  )
}
Don't forget to add it as an input component on the array level!
// Add this to your `deletedDocLogs` array
components: {
  input: DeletionLogInputComponent,
},
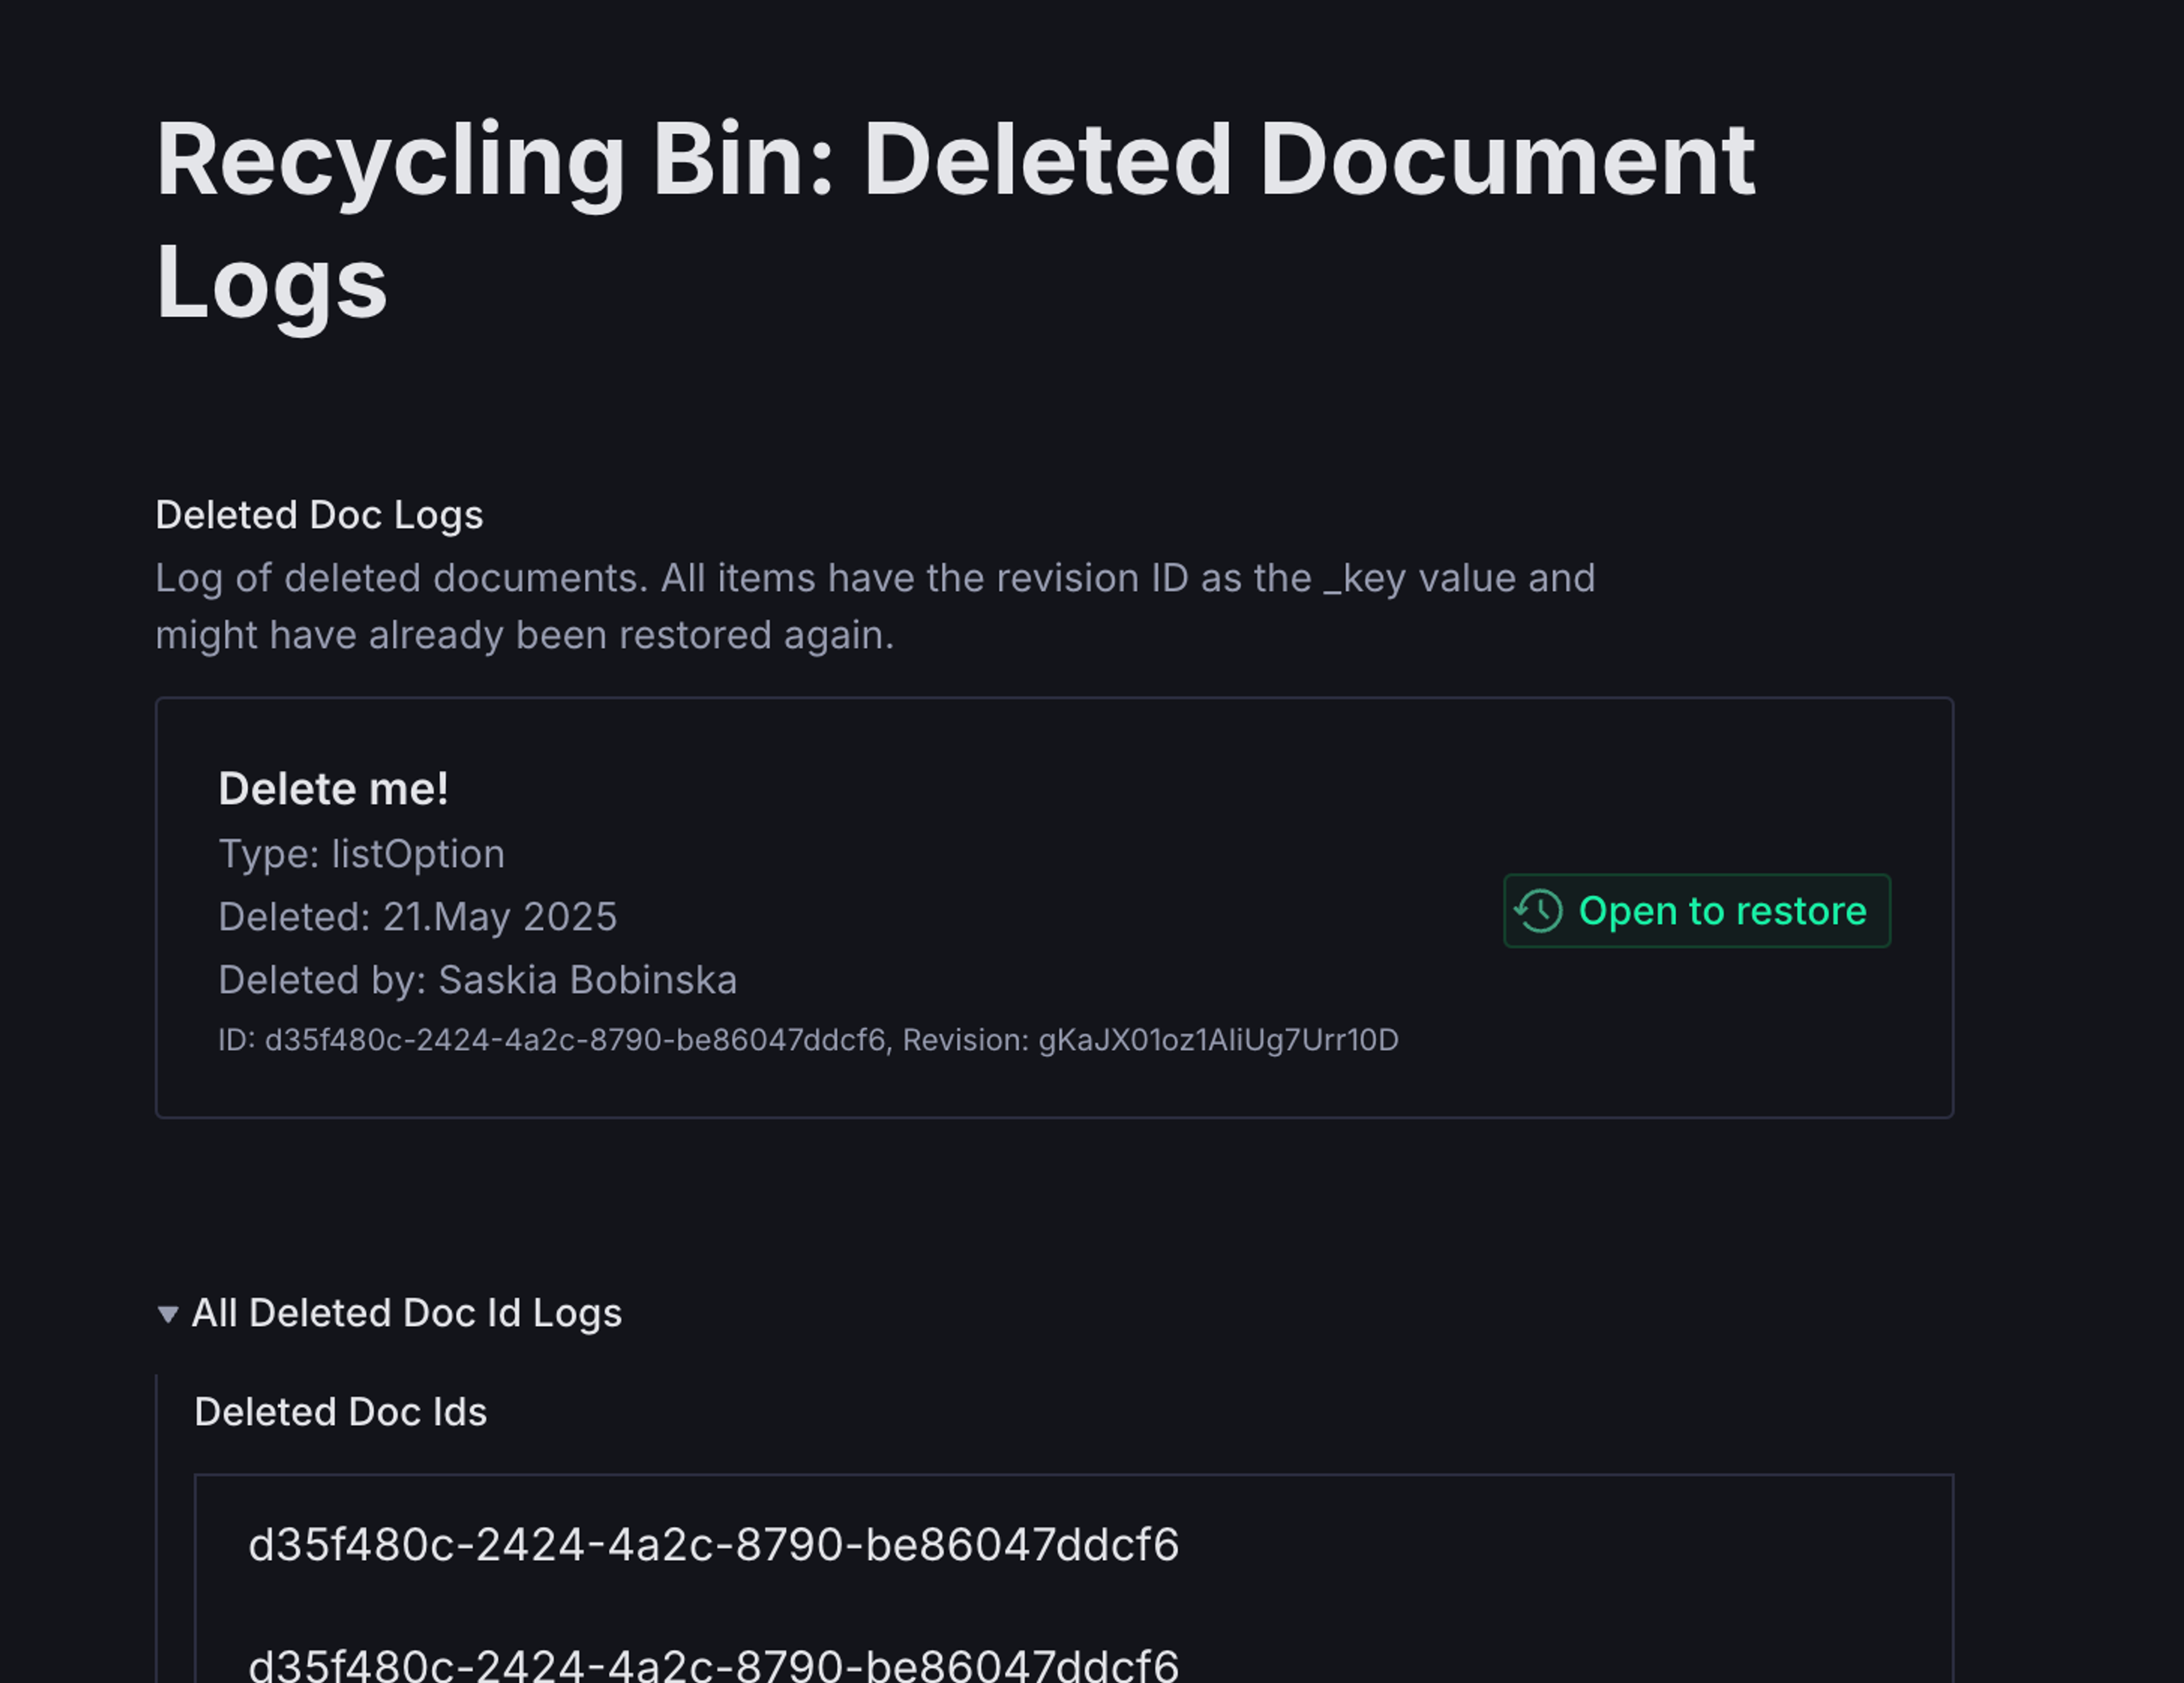
Very good, our document should look like this now 💅: Super fancy and easy to use!

Step 3: Setting up your webhook
For this step we will need to switch from your code editor to a browser.
Open the manage console for your project in question and navigate to the API tab.
Here you find the section for webhooks, where we will now create a new one which will patch the data upon deletion to our fancy-pancy logs.

Explanation of webhooks and mutations
Webhooks can call our mutation API directly, so you don’t need a cloud function to do basic mutations.
URL:
(replace project ID and dataset name, they can’t be templated). This is just our standard mutation endpoint.
https://<PROJECT_ID>.api.sanity.io/<API_VERSION>/data/mutate/<DATASET_NAME>Make sure your API version starts with a v
Dataset:
Select the correct dataset to match the URL.
Trigger:
on update & delete of non-draft docs + add strict filters
Filter:
Make sure you do not add the webhook to all document types but narrow it down to your most valuable ones, or you might potentially generate a huge queue and unnecessarily long log array.
Another thing to always add is a delta function (or even a combination of them), which will further narrow down what kind of updates can trigger the webhook. These are super important.
In our case, we use the operation delta function to catch only deletions.
_type in ['<DOCUMENT_TYPE_A>', '<DOCUMENT_TYPE_B>, '<DOCUMENT_TYPE_C>'] && delta::operation() == 'delete'
Projection:
We pass down our mutation with 2 transactions that patch a single document (using the _type and _id of our singleton bin document) and
- Uses
setIfMissingto create an emptydeletedDocIdsvalue if there is none and then insert a single value (using_id) to the top of ourdeletedDocIdsarray. - Uses
setIfMissingto create an emptydeletedDocLogsvalue if there is none and then insert a LogItem (using_id) to the top of ourdeletedDocIdsarray.
{
  "mutations": [
    // first we patch the array of id strings
    {
      "patch": {
        "query": "*[_type == 'deletedDocs.bin' && _id == 'deletedDocs.bin']",
        "setIfMissing": {'deletedDocIds': []},
        "insert": {
          "before": "deletedDocIds[0]",
          "items": [_id]
         },
      }
    },
    // then we do the same for the logs array
    {
      "patch": {
        "query": "*[_type == 'deletedDocs.bin' && _id == 'deletedDocs.bin']",

        "setIfMissing": {'deletedDocLogs': []},
        "insert": {
          "before": "deletedDocLogs[0]",
          "items": [{
            // we use the deleted doc _id, _type, title or name, as well as the revision ID as the item values and add a now() value from GROQ to also add the datetime we need
            "docId": _id,
            "deletedAt": now(),
            "type": _type,
            "documentTitle": coalesce(title, name),
            "_key": _rev,
            "deletedBy": identity()
          }],
         }
      }
    }
  ]
}
Select POST as the HTTP method in the Advanced settings
Add a header with name Authorization and value Bearer <WRITE_TOKEN> . Make sure the token is an API token with the correct write permissions on that document/dataset.
⚠ DO NOT trigger on drafts. When triggering mutations from a webhook, be very careful about circular updates!!!
If it is triggered on update without adding STRICT filters on changes, etc., then there could be an infinite loop, especially if you are mutating the same document or have another webhook configured, which could be triggered by the changes patched by your webhook.
DONT FORGET TO SAVE THE WEBHOOK CHANGES!
You can actually use this webhook as a template, but need to add your own authentication token, project ID, dataset and document types
Alternative to using webhooks
You can also extend the default delete document action and insert log items that way, but be aware, that this will not work for programmatically deleted documents (via scripts or the CLI).
Another alternative will be a solution using the new Functions and Blueprints, but at the moment (May 2025), functions can only be triggered on publish.
As soon as the remaining triggers are enabled, I will update this guide, or write a new one.
Finished!
Now you are ready to test things in your project.
Was this page helpful?