
Lesson
6
Enhanced Visual Editing with React Loader
Log in to watch a video walkthrough of this lesson
Log in
Switch your data loading and rendering to React Loader for the ultimate live preview experience.
Log in to mark your progress for each Lesson and Task
React Loader is an optional enhancement that mainly benefits live preview.
The benefit to implementing React Loader is far faster previews and the ability to toggle between perspectives in Presentation. The cost – as it is currently implemented – is defaulting the entire tree to act as client components. You should weigh up the benefits of this before proceeding.
So far in this course, Visual Editing works because the client-side VisualEditing component intermittently rehydrates client-side content from server-side updates. This is typically fast enough for most projects. However, consider switching your data fetching to React Loader for even quicker, fine-grained updates when using Visual Editing inside Presentation.
See the documentation about Fetching content for Visual Editing
React Loader provides a server-side method of fetching data and client-side hooks for updating it. With these configured, draft content is transmitted between Presentation and your Next.js application without a network round-trip. It also allows you to toggle the current Perspective when using Presentation.
Switching to React Loader will require:
- A change to how you fetch content server-side, configuring a "Query Store" instead of Sanity Client or the
sanityFetchhelper function - In Draft Mode, wrapping components that render "previewable" content with a Client Component that calls
useQueryhook from React Loader for faster previews. - Calling the
useLiveModehook exported by React Loader in the root layout.
This is an optional upgrade, which is better to add to your project sooner.
React Loader is not included as part of next-sanity and must be installed separately.
Run the following to install React Loader
npm install @sanity/react-loaderYou will need to create a file for your server-side loader configuration. These options are very similar to those configured in sanityFetch in previous lessons. However, loadQuery will return both the queried response and content source maps, in a shape that the client-side useQuery hook expects.
Create a new file to export the server-side
loadQuerysrc/sanity/lib/loader.ts
import 'server-only'
import * as queryStore from '@sanity/react-loader'import { draftMode } from 'next/headers'
import { client } from '@/sanity/lib/client'import { token } from '@/sanity/lib/token'
queryStore.setServerClient(client.withConfig({ token }))
// Automatically handle draft modeexport const loadQuery = ((query, params = {}, options = {}) => {  const usingCdn = client.config().useCdn  const isDraftMode = draftMode().isEnabled
  if (isDraftMode && !token) {    throw new Error('Missing environment variable SANITY_API_READ_TOKEN')  }
// Don't cache by default let revalidate: number | false = 0 // If `next.tags` is set, and we're not using the CDN, then it's safe to cache if ( !usingCdn && Array.isArray(options.next?.tags) && options.next.tags.length ) { revalidate = false } else if (usingCdn) { revalidate = 60 } return queryStore.loadQuery(query, params, { ...options, next: { revalidate, ...(options.next || {}), }, perspective: isDraftMode ? 'previewDrafts' : 'published', // Enable stega if in Draft Mode, to enable overlays when outside Sanity Studio stega: isDraftMode, })}) satisfies typeof queryStore.loadQueryIn previous lessons, you created components to render the response for post-type documents. PostCard on the posts index route and Post on the individual post route.
These must be "wrapped" in a Client Component that calls a useQuery hook. Since these are conditionally loaded Client Components, they should not end up in your production client bundle and have no impact on end-users of your front-end.
Create a preview wrapper component for
Postsrc/components/PostPreview.tsx
'use client'
import { QueryResponseInitial, useQuery } from '@sanity/react-loader'
import { POST_QUERY } from '@/sanity/lib/queries'import { POST_QUERYResult } from '@/sanity/types'import { Post } from '@/components/Post'import { useParams } from 'next/navigation'
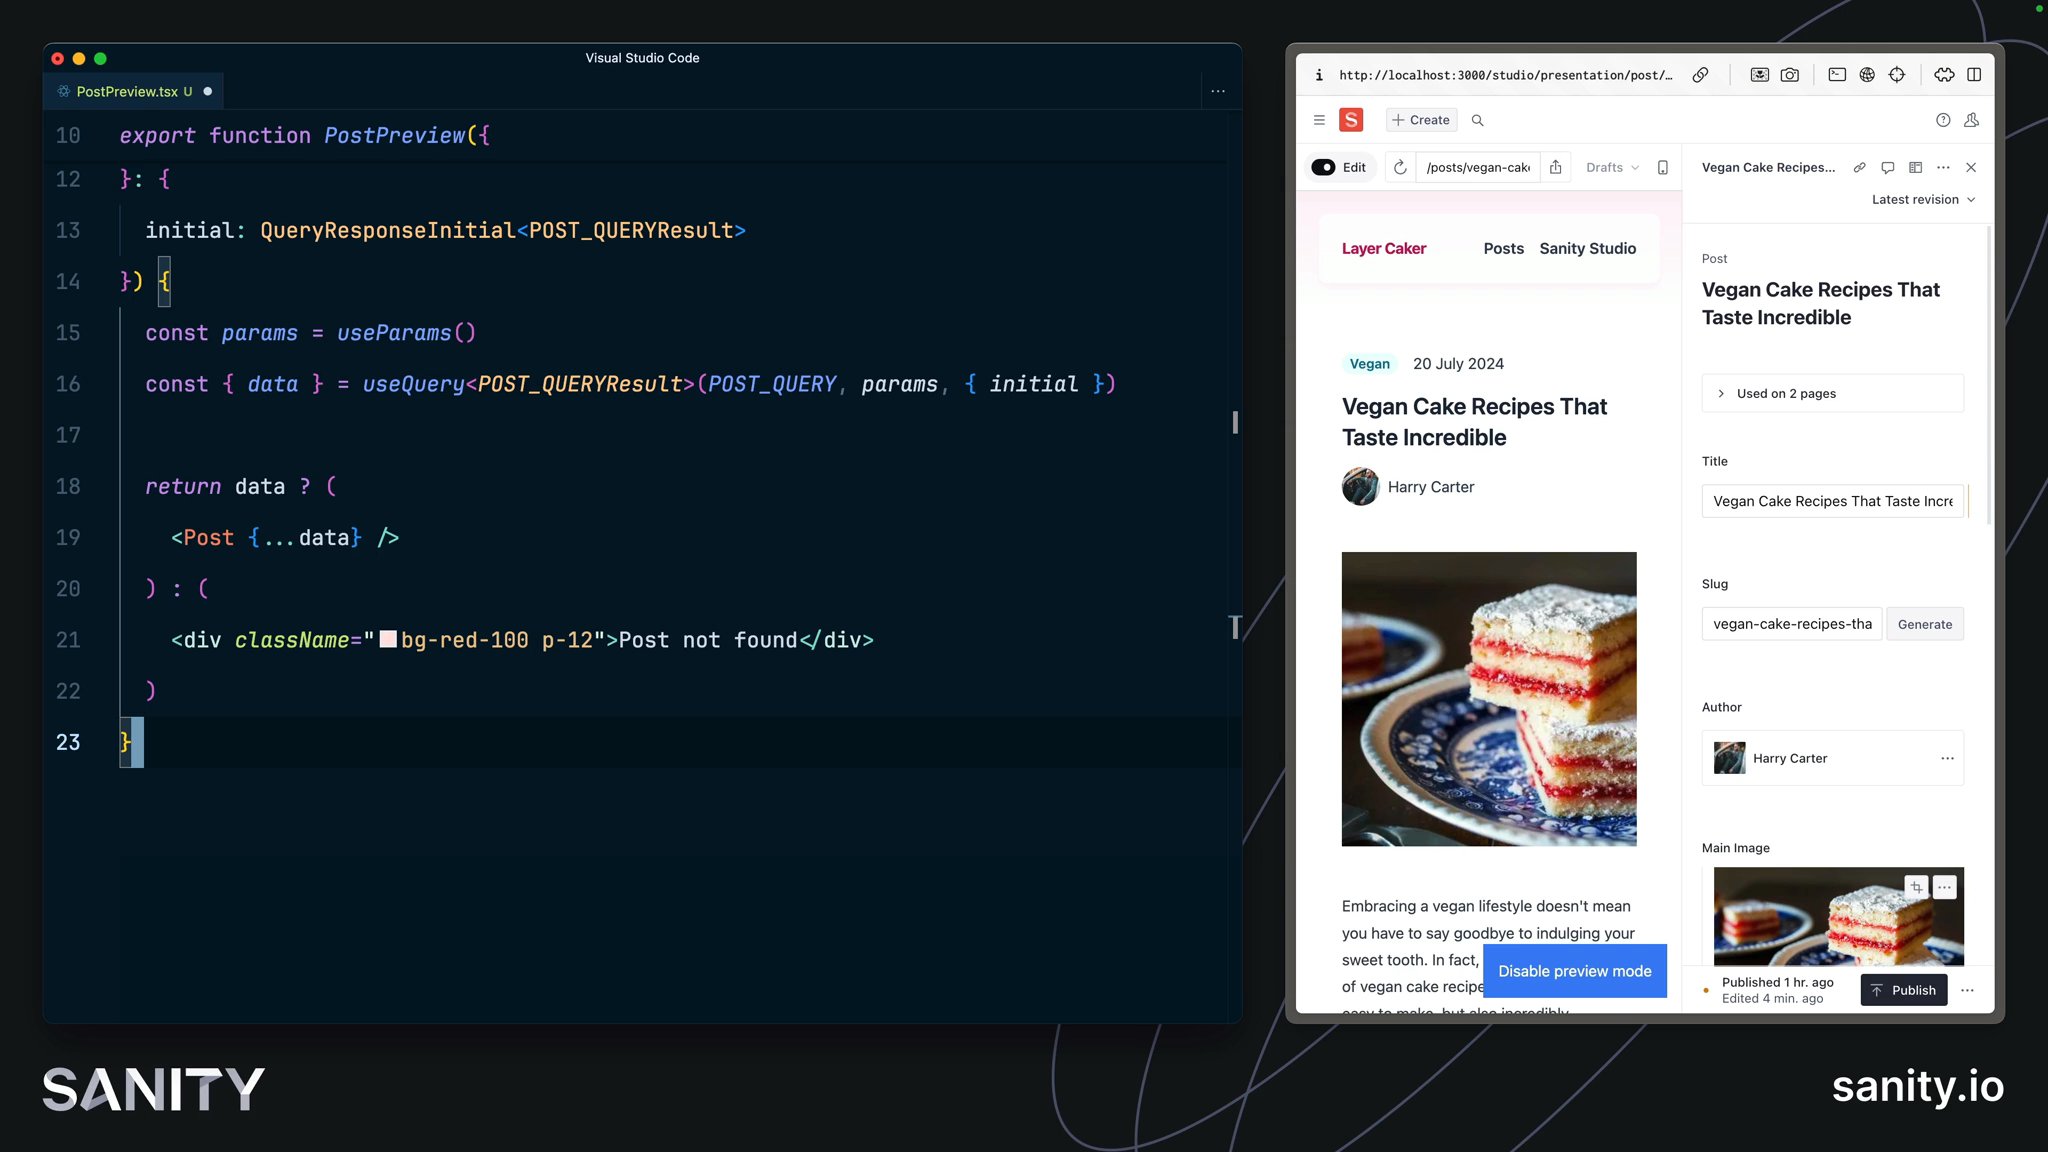
export function PostPreview({ initial,}: { initial: QueryResponseInitial<POST_QUERYResult>}) { const params = useParams() const { data } = useQuery<POST_QUERYResult>(POST_QUERY, params, { initial })
return data ? ( <Post {...data} /> ) : ( <div className="bg-red-100 p-12">Post not found</div> )}Create a preview wrapper component for
PostCardsrc/components/PostCardPreview.tsx
'use client'
import { QueryResponseInitial, useQuery } from '@sanity/react-loader'
import { POSTS_QUERY } from '@/sanity/lib/queries'import { POSTS_QUERYResult } from '@/sanity/types'import { PostCard } from '@/components/PostCard'
export function PostCardPreview({  initial,}: {  initial: QueryResponseInitial<POSTS_QUERYResult>}) {  const { data } = useQuery<POSTS_QUERYResult>(POSTS_QUERY, {}, { initial })
return Array.isArray(data) && data.length > 0 ? ( data.map((post) => <PostCard key={post._id} {...post} />) ) : ( <div className="bg-red-100 p-12">No posts found</div> )}Now, with the Client Components created, update your route files to check for Draft Mode being enabled and load the correct component.
You'll also notice in the examples below that the data fetching method has changed from sanityFetch to loadQuery. Again, it performs the same functions as before, but now returns the response in the data attribute of an object which may also contain information about content source maps and more.
Update your post index route to use
loadQuery and PostPreviewsrc/app/(frontend)/posts/page.tsx
import { draftMode } from 'next/headers'import { loadQuery } from '@/sanity/lib/loader'import { PostCard } from '@/components/PostCard'import { PostCardPreview } from '@/components/PostCardPreview'import { POSTS_QUERY } from '@/sanity/lib/queries'import { POSTS_QUERYResult } from '@/sanity/types'import { Title } from '@/components/Title'
export default async function Page() {  const initial = await loadQuery<POSTS_QUERYResult>(    POSTS_QUERY,    {},    { next: { tags: ['post', 'author', 'category'] } },  )
  return (    <main className="container mx-auto grid grid-cols-1 gap-6 p-12">      <Title>Post Index</Title>      <div className="flex flex-col gap-24 py-12">        {draftMode().isEnabled ? (          <PostCardPreview initial={initial} />        ) : (          initial.data.map((post) => <PostCard key={post._id} {...post} />)        )}      </div>    </main>  )}
Currently, neither
loadQuery or useQuery support the same automatic type inference seen in Sanity Client, so you must pass a generic to declare the return type of the initial data.Update your individual post route to use
loadQuery and PostPreviewsrc/app/(frontend)/posts/[slug]/page.tsx
import { draftMode } from 'next/headers'import { loadQuery } from '@/sanity/lib/loader'import { notFound } from 'next/navigation'import { Post } from '@/components/Post'import { POST_QUERY } from '@/sanity/lib/queries'import { POST_QUERYResult } from '@/sanity/types'import { PostPreview } from '@/components/PostPreview'
type PostIndexProps = { params: { slug: string } }
export default async function Page({ params }: PostIndexProps) {  const initial = await loadQuery<POST_QUERYResult>(POST_QUERY, params, {    next: { tags: [`post:${params.slug}`, 'author', 'category'] },  })
  if (!initial.data) {    notFound()  }
return ( <main className="container mx-auto grid grid-cols-1 gap-6 p-12"> {draftMode().isEnabled ? ( <PostPreview initial={initial} /> ) : ( <Post {...initial.data} /> )} </main> )}Lastly, in the root layout file you have already imported a VisualEditing component from next-sanity. However, it was configured for simple, intermittent hydration.
To make the front end listen in real time you'll create your own version of this component that includes the useLiveMode hook, which will look for every instance of useQuery and instantly update the data as draft changes are received.
Create a new
LiveVisualEditing componentsrc/components/LiveVisualEditing.tsx
'use client'
import { useLiveMode } from '@sanity/react-loader'import { createClient, VisualEditing } from 'next-sanity'import { useEffect } from 'react'
import { apiVersion, dataset, projectId } from '@/sanity/env'
// Always enable stega in Live Modeconst stegaClient = createClient({  projectId,  dataset,  apiVersion,  useCdn: false,  stega: { enabled: true, studioUrl: '/studio' },})
export function LiveVisualEditing() {  useLiveMode({ client: stegaClient })  useEffect(() => {    // If not an iframe or a Vercel Preview deployment, turn off Draft Mode    if (process.env.NEXT_PUBLIC_VERCEL_ENV !== 'preview' && window === parent) {      location.href = '/api/disable-draft'    }  }, [])
  return <VisualEditing />}
Update your root layout to replace the previous
VisualEditing component with your LiveVisualEditing componentsrc/app/(frontend)/layout.tsx
import '@/app/globals.css'import { Header } from '@/components/Header'import { LiveVisualEditing } from '@/components/LiveVisualEditing'import { draftMode } from 'next/headers'
export default function RootLayout({ children,}: Readonly<{ children: React.ReactNode}>) { return ( <html lang="en"> <body className="bg-white min-h-screen"> {draftMode().isEnabled && ( <a className="fixed right-0 bottom-0 bg-blue-500 text-white p-4 m-4" href="/api/draft-mode/disable" > Disable preview mode </a> )} <Header /> {children} {draftMode().isEnabled && <LiveVisualEditing />} </body> </html> )}Now in Presentation, edits made in a document should appear near-instantly in the front end. You should now also be able to toggle between draft and preview modes within the Presentation tool.
Let's wrap up what we've achieved in the next lesson.
You have 8 uncompleted tasks in this lesson
0 of 8