Agent Context
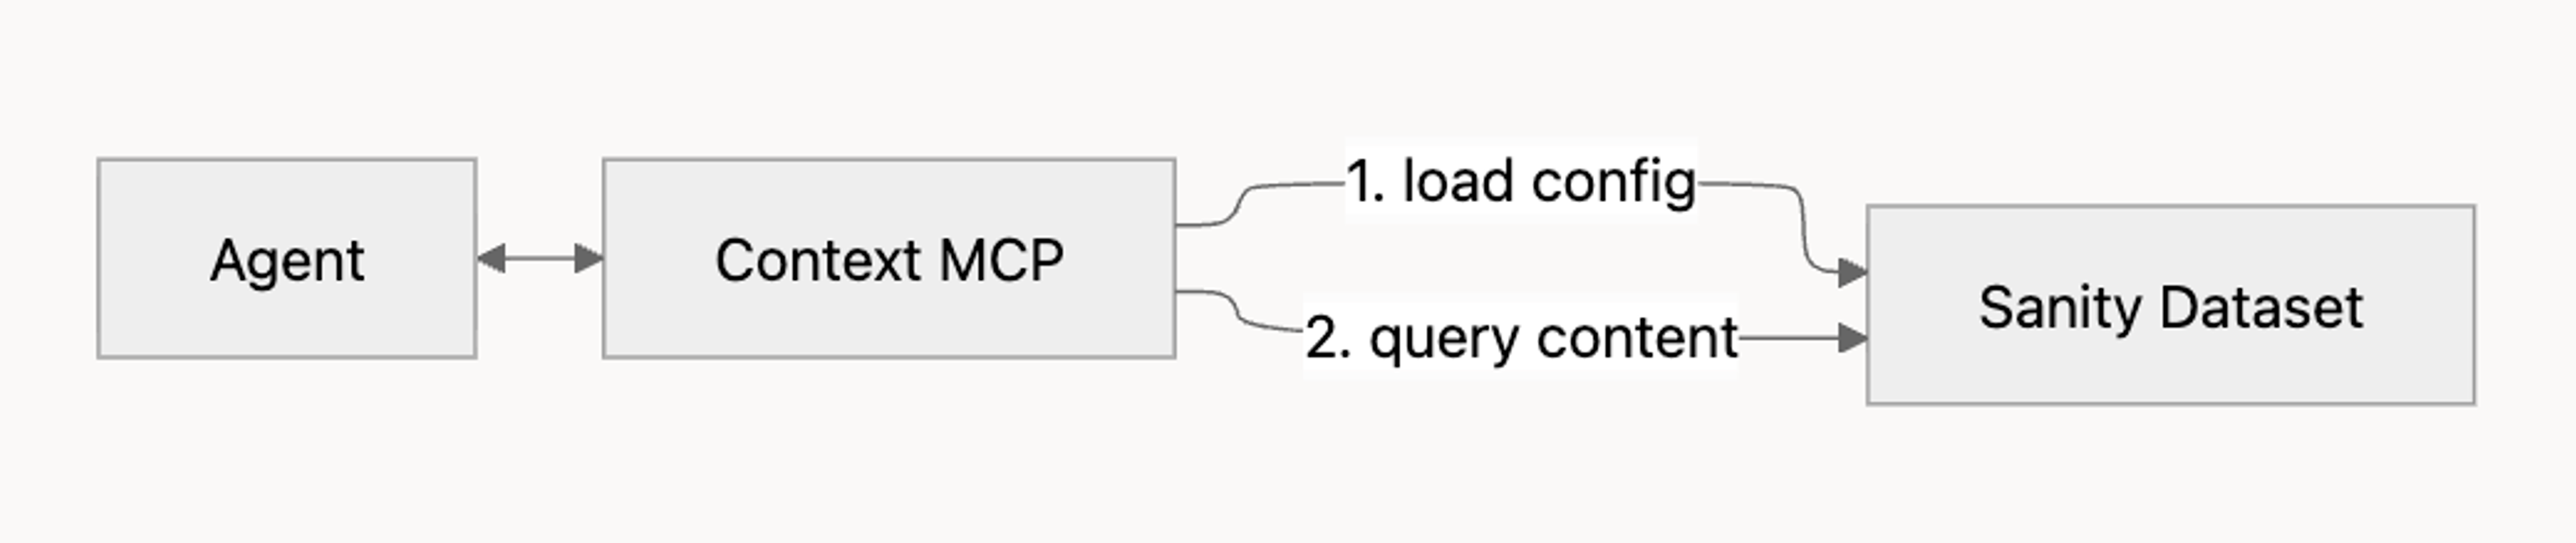
Agent Context is a hosted Model Context Protocol (MCP) server that gives AI agents structured, read-only access to a Sanity dataset.
Agents can read your schema, run GROQ queries, follow references between documents, and use semantic search when embeddings are enabled.
Agent Context allows you to build production agents that serve your users. Use it to build a support assistant that answers from your docs, a shopping assistant that recommends from your catalog, an editorial helper that surfaces related work, and more.
By the end of this article you'll have a working MCP endpoint, an example agent connected to it, and the mental model for tuning the configuration to your own use case.
How it fits together
Agent Context is one piece of a working agent setup. You bring four things:
- An MCP-capable AI client. Cursor, Claude Code, your own application built with the Vercel AI SDK, or any other framework that speaks MCP.
- A model. Use a frontier model like Claude Sonnet, Claude Opus, GPT-5, or equivalent. Tool-calling against a schema-aware MCP server is the kind of work smaller models tend to get wrong: misselected tools, malformed GROQ, hallucinated field names.
- A Sanity project with content. Agent Context reads from your dataset; an empty dataset gives the agent nothing to work with.
- An Agent Context configuration. A Studio document that defines what the agent can see, plus optional instructions that shape its behavior.
Agent Context provides the scoped, schema-aware window into your content. It doesn't run the agent loop itself, and it can't write back to your dataset. If you need an agent that creates or modifies content, see the Sanity MCP Server. If you want a built-in editorial assistant inside Studio, see Content Agent.
Quick start
Before you start, make sure you have:
- An MCP-capable AI client (Cursor, Claude Code, or your own using an MCP SDK).
- A frontier model available (Claude Sonnet, Claude Opus, GPT-5, or equivalent).
- A Sanity project with deployed content and a read token.
Full details in Prerequisites.
Install the agent-context skill
Skills are guided workflows your AI client can run. This one walks you through configuring Agent Context end to end.
npx skills add sanity-io/agent-context --all
pnpm dlx skills add sanity-io/agent-context --all
yarn dlx skills add sanity-io/agent-context --all
bunx skills add sanity-io/agent-context --all
Prompt your AI client to run the setup skill
The create-agent-with-sanity-context skill asks about your goal, inspects your project, and walks you through configuring Studio, building an example agent, and optionally adding a frontend UI.
Use the create-agent-with-sanity-context skill to help me build an agent in this project.Follow the guided steps
The skill generates the schema, code, and configuration you need.
When you're done, you'll have:
- An Agent Context document published in your Studio.
- A working MCP endpoint URL.
- A reference agent implementation (Next.js + Vercel AI SDK by default) that can query your content.
For a deeper walk-through of what the skill produces, see What the skill installs. To set everything up by hand, see Manual setup. To collect and analyze agent chats, set up Agent Context Insights.
Prerequisites
To set up Agent Context, you'll need:
- A Sanity project with content. Agent Context queries your existing data; an empty dataset gives the agent nothing to work with.
- Sanity Studio 5.1.0 or later. Agent Context reads schema from your deployed Studio, which requires server-side schema (available from 5.1.0 onward).
- A deployed schema. Run
sanity schema deployto push your schema, orsanity deployto host Studio on Sanity's infrastructure (which deploys the schema as part of the process). - A Sanity API read token. Create one at sanity.io/manage. Agents only need read access; keep the token server-side.
- A frontier model and API key. Use Claude Sonnet, Claude Opus, GPT-5, or equivalent. Smaller models tend to misuse tools, write malformed GROQ, or hallucinate field names. Get a key from Anthropic, OpenAI, or your provider of choice.
- A frontend application (optional). Where your agent will live, such as Next.js or Remix.
What the skill installs
Running npx skills add sanity-io/agent-context --all adds three skills to your AI client. Each handles a different stage of building and refining an agent.
create-agent-with-sanity-contextis the main setup skill. It walks you through installing the Studio plugin, creating an Agent Context document, generating an example agent (Next.js + Vercel AI SDK by default), and optionally scaffolding a frontend chat UI. Start here.shape-your-agentgenerates a focused system prompt for the agent, typically 200 to 400 words. It asks about your target audience, tone, constraints, and fallback behavior, then produces prompt text tuned for Agent Context. Run this after the main setup, when you want to refine how the agent speaks and reasons.dial-your-contexthelps you write theinstructionsfield on the Agent Context document. Theinstructionsfield shapes what the agent prioritizes when it queries content. The skill prompts you for the agent's purpose and rewrites the field iteratively.
You can install just the main skill with npx skills add sanity-io/agent-context/create-agent-with-sanity-context. The --all flag (recommended) gets you the full toolkit.
Setup is iterative. You'll likely run all three skills over the course of taking an agent to production: the main one to scaffold, then the other two to tune.
Core components
Agent Context has four building blocks: the Agent Context document (your configuration), the MCP endpoint (what your agent connects to), and a small set of tools the agent uses to read your content.
Agent Context document
An Agent Context document defines what an agent can see in your dataset and how it should behave. You manage these documents in Studio using the @sanity/agent-context plugin. Each document has the following fields:
name. A human-readable name. Shown only in Studio.slug. The identifier the MCP endpoint uses. Set this to something short and stable, likesupport-botorproduct-catalog.instructions. Custom instructions for the agent, in plain language. For example: "Respond in Spanish" or "Only answer questions about product documentation; for anything else, suggest contacting support."groqFilter. An optional GROQ filter expression that limits which documents the agent can read. See Filtering content below.
Filtering content
The groqFilter field accepts a GROQ filter expression, the part inside the [ ... ] of a full GROQ query. It restricts the agent to a subset of your dataset.
Supported operators:
| Operator | Use |
|---|---|
| ==, != | Equality |
| >, <, >=, <= | Comparison |
| &&, || | Boolean combination |
| in | Membership |
| defined() | Field existence check |
Sub-queries, projections, and ordering are not supported in groqFilter. Use it to scope, not to shape; the agent applies its own queries on top of whatever filter you set.
Examples:
_type == "product"
_type in ["article", "author"]
_type == "product" && public == true
MCP endpoint
Once you publish an Agent Context document, the MCP server is reachable at:
https://api.sanity.io/:apiVersion/agent-context/:projectId/:dataset/:slug| Segment | Description |
|---|---|
| :apiVersion | API version in vYYYY-MM-DD format, e.g. v2026-02-27 |
| :projectId | Your project ID |
| :dataset | Dataset name |
| :slug | Slug of the Agent Context document |
You can also connect without a document, using only URL parameters to pass configuration. That endpoint omits the slug:
https://api.sanity.io/:apiVersion/agent-context/:projectId/:datasetThis pattern is useful for quick testing, isolated environments, or cases where you'd rather not maintain a Studio document. See Without an Agent Context document for the full pattern.
URL parameters
The endpoint accepts the following query parameters. These apply at request time and are not stored on the document:
| Parameter | Description |
|---|---|
| instructions | Overrides the document's instructions for this request |
| groqFilter | Overrides the document's GROQ filter for this request |
| perspective | Content perspective to query. Defaults to published; set to drafts to include draft content |
| embeddings | Set to true to enable semantic search |
| workspace | Workspace name; only applies when multiple workspaces share a dataset |
If you pass a parameter that also exists on the Agent Context document, the URL parameter wins for that request.
Tools
Connecting an MCP client to the endpoint exposes three tools. Most agents use all three over the course of a single conversation:
| Tool | Purpose |
|---|---|
| initial_context | Returns a compressed overview of your schema. Agents usually call this first to understand what types exist |
| schema_explorer | Returns detailed schema information for a specific type, including fields and references |
| groq_query | Executes a GROQ query against the dataset, subject to any groqFilter in effect |
You can test the endpoint by listing the tools directly with curl:
curl -X POST https://api.sanity.io/v2026-02-27/agent-context/$PROJECT_ID/$DATASET/$SLUG \
  -H "Authorization: Bearer $SANITY_API_READ_TOKEN" \
  -H "Content-Type: application/json" \
  -d '{"jsonrpc":"2.0","id":1,"method":"tools/list"}'
A successful response returns a JSON object with a result.tools array listing the three tools above. If you see a 401, your token is missing or invalid; see Troubleshooting.
Semantic search
Agent Context supports semantic search when embeddings are enabled on the dataset. With embeddings, the agent can rank results by meaning rather than exact-match alone. That's useful for natural-language queries like "products that work in cold weather" or "articles about retention strategies."
Semantic search becomes available through the text::semanticSimilarity GROQ function. The agent calls it inside a groq_query like any other GROQ feature.
To enable it:
- Enable embeddings on the dataset. See Dataset embeddings for the full setup.
- Pass
?embeddings=trueon the MCP endpoint URL, or set it on the Agent Context document.
Combining filters and semantic search
Semantic search composes with groqFilter. The filter restricts what the agent can see; semantic search ranks the visible documents by relevance. Together they produce scoped, ranked results, which is what most production agents actually want.
For example, an agent configured with groqFilter: _type == "product" && inStock == true can run a query like this:
*[_type == "product" && inStock == true]
  | score(text::semanticSimilarity($query, name, description))
  | order(_score desc)
  [0...10]
  { name, description, _score }
The groqFilter ensures the agent only sees in-stock products. The score() and text::semanticSimilarity() calls rank those products by how well they match the user's intent. Capable agents construct queries like this on their own once they see embeddings=true. If the ranking isn't surfacing what you want, use the instructions field to suggest specific fields to rank against or a baseline query shape.
When to enable embeddings
Enable embeddings when your agent needs to handle natural-language queries over a corpus where exact-match filtering isn't enough. Product catalogs, knowledge bases, help content, and editorial articles are good candidates. Skip embeddings for tightly structured lookups (a known SKU, a slug-based fetch, a reference resolution) where keyword filters already return the right answer.
Embeddings have storage and compute costs. See Dataset embeddings for pricing and the configuration choices that affect cost.
Full installation steps
There are two ways to set up Agent Context: with the agent-context skill, or by hand. The skill is the fastest path and the one we recommend if you're starting from scratch or scaffolding a new agent. Manual setup is the right choice if you're integrating Agent Context into an existing application, if you need a configuration the skill doesn't cover, or if you want to read each piece before installing it.
Using the skill
Covered in Quick start. After running the setup skill, you'll have:
- The
@sanity/agent-contextplugin installed and registered in your Studio config. - An Agent Context document, configured and published.
- A reference agent implementation (Next.js + Vercel AI SDK) wired to the MCP endpoint.
- Optionally, a basic chat UI.
Iterate on the result with shape-your-agent and dial-your-context. See What the skill installs.
Manual setup
Set up Agent Context by hand when you want explicit control over each step, when you're wiring Agent Context into a codebase the skill doesn't know about, or when you'd rather read each piece before running it. Manual setup has two paths depending on whether you want a Studio document to manage configuration:
- With an Agent Context document is the recommended pattern for anything beyond quick testing. Configuration lives in Studio, where it's audit-able, editable by non-developers, and shared across environments.
- Without an Agent Context document is for quick testing, one-off scripts, or environments where you'd rather pass configuration in the request itself. All configuration moves to URL parameters.
With an Agent Context document
Install the @sanity/agent-context plugin and add it to your studio config:
import { defineConfig } from 'sanity'
import { agentContextPlugin } from '@sanity/agent-context'

export default defineConfig({
  // ...
  plugins: [agentContextPlugin()],
})
This adds a new Agent Context document type to your studio. Optionally, place the Agent Context document type in a specific spot in your studio structure:
import { AGENT_CONTEXT_SCHEMA_TYPE_NAME } from '@sanity/agent-context'

structure: (S) =>
  S.list()
    .title('Content')
    .items([
      // ... your own items
      S.divider(),
      ...S.documentTypeListItems().filter(
        (item) => item.getId() === AGENT_CONTEXT_SCHEMA_TYPE_NAME
      ),
    ])
Next, create and publish an Agent Context document in your Studio. Configure the fields described in The Agent Context document. The MCP endpoint URL appears at the top of the document form once it's saved.
Use the URL to connect an MCP client:
import {createMCPClient} from '@ai-sdk/mcp'

const mcpClient = await createMCPClient({
  transport: {
    type: 'http',
    url: 'https://api.sanity.io/:apiVersion/agent-context/:projectId/:dataset/:slug',
    headers: {
      Authorization: `Bearer <SANITY_API_READ_TOKEN>`,
    },
  },
})
Verify the connection by listing the available tools:
const tools = await mcpClient.tools()
console.log(tools)
You should see initial_context, schema_explorer, and groq_query. If you don't, see Troubleshooting.
Without an Agent Context document
Connect directly to the project-and-dataset endpoint, passing configuration as URL parameters:
import {createMCPClient} from '@ai-sdk/mcp'

const url = new URL('https://api.sanity.io/:apiVersion/agent-context/:projectId/:dataset')
url.searchParams.set('groqFilter', '_type == "product"')

const mcpClient = await createMCPClient({
  transport: {
    type: 'http',
    url: url.toString(),
    headers: {
      Authorization: `Bearer <SANITY_API_READ_TOKEN>`,
    },
  },
})
Verify the connection the same way:
const tools = await mcpClient.tools()
console.log(tools)
This pattern is convenient for one-off scripts and testing. For anything you deploy, use the document-based path so configuration stays in Studio rather than scattered across deployment environments.
Security and access
Authentication
Agent Context MCP uses Sanity API tokens. Pass the token as a Bearer header on every request:
Authorization: Bearer <SANITY_API_READ_TOKEN>Use a read token. Agents don't need write access; the MCP is read-only by design. Keep the token server-side and never embed it in client code.
What agents can read
Agent Context exposes three things to the agent:
- Your schema. Document types, field definitions, and references.
- Your content. Published documents by default; pass
perspective=draftsto include drafts. - References. Agents can follow references between documents during a query.
What agents see within those is shaped by groqFilter. With no filter set, the agent can read every published document the token has permission to access.
This is a security boundary, not just a UX hint. Use groqFilter to scope agents to the content they should see: public products only, articles in a published state only, knowledge-base entries from a specific category. For example:
_type == "product" && public == true
_type == "article" && status == "published"
_type in ["faq", "guide"] && audience == "customer"
Mutations
Agent Context cannot write to your dataset. If you need an agent that creates or updates documents, run those mutations server-side in your own code after the agent decides what to do. For an MCP-based write path, see the Sanity MCP Server.
Troubleshooting
401 Unauthorized
Your Sanity API token is missing or invalid:
- Confirm the token exists in your environment and is being read by your agent code.
- Confirm the token has read access to the project and dataset you're targeting.
- Confirm it's sent as
Authorization: Bearer <token>, not as a query parameter or a different header.
403 Forbidden
The token authenticated but doesn't have permission to access the dataset or the requested content. Check the token's scope at sanity.io/manage. If you're using dataset-level ACLs, confirm the token's role covers the documents the agent needs to read.
No schema or empty results
Agent Context reads your schema from the server, not your local machine. If the agent reports an empty or missing schema:
- Confirm you're on Sanity Studio 5.1.0 or later.
- Run
sanity schema deploy, or open your hosted Studio in a browser if you deploy withsanity deploy. - Retry the MCP connection.
If the schema deploys but queries still return nothing, check whether groqFilter is excluding everything the agent tries to read. A filter like _type == "product" && public == true returns no results if no product has public: true.
Tools not appearing
If mcpClient.tools() returns an empty array or fewer than three tools:
- Re-check the MCP URL. The path is
agent-context/:projectId/:dataset/:slug. Missing the slug while expecting document-managed config is a common cause. - Confirm the Agent Context document is published, not just saved as a draft.
- Log the response from a manual
tools/listrequest (see Tools the agent can call) to see the raw MCP response.
GROQ filter errors
groqFilter accepts only filter expressions. See Filtering content for what's supported. Common errors:
- Using projection syntax (
{ name, price }) inside the filter. Filters evaluate to true or false; move projections to the agent's queries instead. - Using ordering or slicing (
order(...),[0...10]) inside the filter. Same reason. - Subqueries like
*[...]. Filters are a single boolean expression scoped to one document at a time.
If a filter is invalid, the MCP returns a 400 with the parser error in the response body.
Drafts not appearing
By default, agents only see published documents. To include drafts, pass perspective=drafts as a URL parameter or set it on your Agent Context document. Drafts are only visible to tokens that have read access to drafts; check the token's permissions if you've set perspective=drafts and still see only published content.
Semantic search not returning ranked results
Semantic search requires embeddings to be enabled on the dataset:
- Confirm embeddings are enabled. See Dataset embeddings.
- Confirm
?embeddings=trueis on the MCP URL or set on the document. - Confirm the agent is constructing queries that use
text::semanticSimilarity. Some smaller models won't reach for it without explicit instruction; if the agent ignores it, name the function in yourinstructionsfield.
Small or non-frontier models behaving erratically
If the agent picks the wrong tool, writes malformed GROQ, or invents field names, the model is likely the bottleneck. Tool-calling against a schema-aware MCP is one of the harder workloads in the agent world. Switch to a frontier model (Claude Sonnet, Claude Opus, GPT-5, or equivalent) and rerun. If the behavior improves, that confirms model capability is the limiter.
Next steps
Once your agent is connected and returning tools, you can deepen the integration:
- Build an AI shopping assistant. A step-by-step walkthrough that uses Agent Context to power product discovery.
- AI shopping assistant starter. A full reference implementation on GitHub.
- Configure insights. Track an analyze agent conversations so you can better understand how users interact with the agent and your content.
- Shape your agent's behavior with
shape-your-agentonce you know what the agent should and shouldn't do. - Tune your context instructions with
dial-your-contextonce you have a working baseline and want to refine what the agent prioritizes.