How to generate massive amounts of demo content for Sanity

Official(made by Sanity team)
It can be useful for testing plugins, front ends, or other integrations to have a Sanity Studio populated with fake content.

Simeon Griggs
I’ve been creating Sanity projects since 2019 and, in that time, have developed a few preferences about how new Studios should be structured. I’ve had a version of this guide written down for quite some time as my own reference while testing new schema and plugins. As I spin up several new projects a month, this guide has become increasingly valuable.

I hope that you find this guide useful to eliminate decision paralysis. When I first learned React, Sara Vieira’s Opinionated Guide to React was foundational in removing the sinking feeling of wondering if I was doing it wrong and instead showed one set of conventions I could accept. Paving the way to focusing on the job of actually solving problems.
The intention of this guide is not to slap your hand and make you feel bad if you’re not building Sanity projects just like me. If you feel stuck between multiple choices and need a little nudge to pick one and move forward, you can once you’ve read this guide!
The inverse is also true. These strong opinions are loosely held. The realities of your project may come into conflict with some of the patterns demonstrated here. Make adjustments as you feel if strict adherence to this guide slows down the progress toward your goals.
All of the following are my own personal opinions and do not represent those of Sanity or my colleagues in our wonderful engineering teams. There are valid reasons to diverge from the patterns demonstrated in this guide, and you should not feel bad if you do!
Initialize any new Sanity Studio with the following command:
npm create sanity@latest -- --typescript --template cleanOr to quickly generate a new project, use these additional flags:
npm create sanity@latest -- --template clean --create-project "showcase" --dataset production --typescriptWhy: I’ll never start a new project without TypeScript again and prefer to work with no schema files instead of modifying existing ones.
Install prettier and configure with eslint along with simple-import-sort.
npm install --save-dev eslint-plugin-prettier prettier eslint-plugin-simple-import-sort eslint-plugin-importReplace .eslintrc with the following:
{
  "extends": "@sanity/eslint-config-studio",
  "plugins": ["prettier", "simple-import-sort", "eslint-plugin-import"],
  "ignorePatterns": ["dist", "node_modules", ".sanity"],
  "rules": {
    "prettier/prettier": "error",
    "simple-import-sort/imports": "error",
    "simple-import-sort/exports": "error",
    "@typescript-eslint/consistent-type-imports": "error",
    "import/no-default-export": "error"
  }
}
Add a linting command to your package.json file and run it to format all existing files instantly:
"scripts": {
  // ...all other scripts
  "lint": "eslint . --fix",
}
Why: I never want unformatted code in any file in my codebase ever. I also want code formatting every time I press “save” on a file. Regarding options like line length, semicolons, or single vs double quotes, I agree with Prettier’s philosophy on options, and I genuinely don’t care.
That code is consistently formatted in every file of a project is far more important to me than how it is formatted.
The linting rules above include throwing an error if a default export is used. Default exports can create issues that are more difficult to debug, especially when renaming files or functions. Named exports are more explicit and, therefore, more reliable.
Create a ./src directory and put ./schemaTypes in it.
Note: A workspace can only have one “schema” which is a collection of “schema types.” So, it would be incorrect to use “schemas” here.
mkdir src; mv schemaTypes src/schemaTypesRemember to also update the import to your schema types file in sanity.config.ts
// ./sanity.config.ts

import {schemaTypes} from './src/schemaTypes'
All Sanity Studio-specific files will now live in ./src
For example, I like to create desk structure configuration files like so:
src/
└─ desk/
   ├─ structure.ts
   └─ defaultDocumentNode.ts
Why: I don’t like anything in the root directory other than project-impacting configuration files. Collating all Studio-specific files into a single folder makes it more easily portable between Studio projects.
All schema types should always use the defineType, defineField, and defineArrayMember helper plugins. They are optional, but they make authoring and debugging schema in TypeScript simpler.
All registered schema export a named const that matches the filename. This only applies if it does not have input components.
// ./src/schemaTypes/lessonType.ts

import {defineField, defineType} from 'sanity'

export const lessonType = defineType({
  name: 'lesson',
  title: 'Lesson',
  type: 'document',
  fields: [
    defineField({
      name: 'title',
      type: 'string',
    }),
  ],
})
src/ └─ schemaTypes/ ├─ index.ts └─ lessonType.ts
If a schema type has input components, they should be colocated with the schema type file. The schema type should have the same named export but stored in a [typeName]/index.ts file:
// ./src/schemaTypes/seoType/index.ts

import {defineField, defineType} from 'sanity'

import seoInput from './seoInput'

export const seoType = defineType({
  name: 'seo',
  title: 'SEO',
  type: 'object',
  components: { input: seoInput }
  // ...
})
These components should be named [name]-[componentType]
src/
└─ schemaTypes/
   └─ seoType/
      ├─ index.ts
      ├─ seoInput.ts
      └─ seoField.ts
They can all be imported and collated in your schema types like this:
// ./src/schemaTypes/index.ts

import {lessonType} from './lessonType'
import {seoType} from './seoType'

export const schemaTypes = [lessonType, seoType]
Why: Named exports are simpler to debug, import, and refactor.
Sanity Studio offers many ways to enrich the content editing UI on behalf of your authors – and you should use them.
Every document and object schema type should:
icon property from either @sanity/icons, or if you need more variety, the Lucide set has a larger selection.preview property so that desk lists, reference fields, and search results show rich content about the document.icon property as well.Some plugins – like Structure and Presentation – may require complex configuration. Those files will need to live somewhere in your project.
Keep a ./src/plugins folder for any plugins you create in your Studio. There is an example of this in the next section.
Instead, create a folder for each plugin and store your configuration functions within these. For example, create a structure folder for your configuration of the structureTool plugin.
// ./sanity.config.ts

// ...other imports
import {structure, defaultDocumentNode} from './src/structure'

export default defineConfig({
  // ...other settings
  plugins: [
    // ...other plugins
    structureTool({structure, defaultDocumentNode})
  ],
})
This should leave you with folder structures for the Structure and Presentation plugins like:
src
├─ structure
│   └─ index.ts
└─ presentation
└─ locate.tsIf you are developing a suite of functions, components, and Studio features that are related – combine them as a new plugin. Plugins do not need to be distributed to npm – just create a plugins directory and store related files there.
Plugins in Sanity Studio v3 are mini encapsulations of a Workspace config. So you could register a new tool, schema, document badges and actions, form components, and more in a single file.
Why: This makes sharing functionality between projects simpler but can also help with debugging by being able to disable an entire set of features by removing a single plugin from the Workspace config.
Imagine you’ve been tasked to indicate the exhilaration of an approval process in the Studio. To visualize this, you’ll build a custom form component to display confetti when a document is approved. As well as rendering a document badge on approved documents.
This requires several parts of the Studio configuration API and could be useful in more than a single project.

So you’d create a plugins folder inside your Studio, and in it, register the plugin’s schema types, form components, and document badges inside.
// ./src/plugins/approval/index.ts

import {definePlugin} from 'sanity'

import {ApprovedBadge} from './badges'
import {approvedType} from './schemaTypes/approvedType'

export const approval = definePlugin({
  name: 'approval',
  schema: {types: [approvedType]},
  document: {badges: (prev) => [...prev, ApprovedBadge]},
})
All these files would look like this in your project:
src
└─ plugins
   └─ approval
      ├─ index.ts
      ├─ badges
      │  └─ index.ts
      └─ schemaTypes
         ├─ approvedType
         │  ├─ ApprovedInput.tsx
         │  └─ index.ts
         └─ index.ts
The plugin can then be activated in the Studio by adding it to your sanity.config.ts and deactivated for specific users, environments, or just by commenting it out.
// ./sanity.config.ts

// ...other imports
import {approval} from './src/plugins/approval'

export default defineConfig({
  // ...other settings
  plugins: [
    // ...other plugins
    approval()
  ],
})Putting all of the file tree diagrams together in the previous examples ends up with a Studio repository that looks something like this.
Note that this doesn't cover every permutation of the possibilities of handling multiple workspaces. You may choose to apply this differently.
src

│  // Required: Root-level config files
├─ tsconfig.json
├─ package-lock.json
├─ package.json
├─ sanity.cli.ts
├─ sanity.config.ts

│  // Optional: Root-level files
├─ .eslintrc
├─ .gitignore
├─ README.md

│  // Required: Automatically generated folders
├─ node_modules
│  └─ ...
├─ dist
│  └─ ...
├─ static
│  └─ ...

│  // Required: Configure your Studio schema types
├─ schemaTypes
│  ├─ index.ts
│  ├─ lessonType.ts
│  └─ seoType
│     ├─ index.ts
│     ├─ seoField.ts
│     └─ seoInput.ts

│  // Optional: Configure Studio plugins and tools
│  // Your Studio may have none, some or more than these
├─ actions
│  └─ index.ts
├─ badges
│  └─ index.ts
├─ plugins
│  └─ approval
│     ├─ badges
│     │  └─ index.ts
│     ├─ index.ts
│     └─ schemaTypes
│        ├─ approvedType
│        │  ├─ ApprovedInput.tsx
│        │  └─ index.ts
│        └─ index.ts
├─ presentation
│  └─ locate.ts
└─ structure
   └─ index.ts

│  // Optional: CLI commands
├─ migrations
│  └─ ...
Variable names used for GROQ queries should be written in “screaming snake case,” for example, POSTS_QUERY. This is purely a stylistic preference and has no functional benefit. Remember: this is an extremely opinionated guide.
In many programming languages, this casing is used for variables that are not expected to change. While your GROQ query can be any string value, it should be considered an anti-pattern to generate them from functions or have logic in your app modify the query string.
GROQ query strings should be prefixed with the groq helper from the npm package, as it provides syntax highlighting in VS Code when you have the Sanity.io VS Code extension installed, and are required when using Sanity TypeGen.
export const POSTS_QUERY = groq`*[_type == "post"]`Short queries like the above are fine on one line. Longer queries, especially those with projections, should use many lines so the logic in both the filter (the [] bit) and projection (the {} bit) are easier to read. They’re also simpler to debug, as you can remove filter arguments or parts of the projection by commenting out those lines.
export const POST_QUERY = groq`*[
  _type == "post"
  && slug.current == $slug
][0]{
  _id,
  title,
  image,
  author->{
    _id,
    name
  }
}`Array/Object expansion (three dots like this ... commonly called a “spread” operator) should be used sparingly.
During development, you may find it simpler not to use a projection or return all attributes in a filter using this operator. However, this leads to “over-fetching,” where more data is returned than necessary. Slowing down response times.
Explicitly naming attributes in a projection also makes it clearer what data is relied upon by the application that consumes it.
By the time your app is in production:
[] in every GROQ query should have a projection{} should contain array/object expansion ...One way to ensure parity between your queries and your application is to run the result of your query through a validation library like Zod. This can validate returned data to ensure attributes are the correct value, and strict mode checking ensures no missing or additional attributes. It will also help by generating TypeScript types.
You’ll likely be less frustrated adding Zod the sooner you add it to a project, so I recommend it during development. For more on this topic, I have written a separate blog post on using Zod with Sanity.
Use $variables in your queries instead of string interpolation to insert values.
Variables are safer and make queries easier to understand.
// Don't do this, it breaks easily and is difficult to read
const TYPE_QUERY = (type) => groq`*[_type == "${type}"]`

// Do this and pass parameters to Sanity Client
const TYPE_QUERY = groq`*[_type == $type]`
There are occasions when string interpolation is unavoidable. It’s currently not possible to use variables to declare attributes. So the following is acceptable.
const fieldName = 'bedrooms'
const FIELD_QUERY = groq`*[${fieldName} > 5]`Rules were meant to be broken!
An exception to several of the opinions above is when you wish to re-use a GROQ query’s filter or projection inside of multiple queries, as GROQ does not yet support “fragments” or reusable query segments.
In the example below, a GROQ projection has been created as its own standalone variable, which can be reused with string interpolation into multiple complete query strings.
const PAGE_BUILDER_PROJECTION = groq`{
  _key,
  _type,

  // ...any other attributes common to all types

  _type == "pageBuilderVideo" => {
    video->
  },
  _type == "pageBuilderTeam" => {
    staff[]->
  },
}`

export const PAGE_QUERY = groq`*[_type == "page" && slug.current == $slug][0]{
    _id,
    title,
    pageBuilder[]${PAGE_BUILDER_PROJECTION},
}`

export const HOME_QUERY = groq`*[_id == "home"][0]{
    _id,
    title,
    pageBuilder[]${PAGE_BUILDER_PROJECTION},
}`
To demonstrate just how loosely held these strong opinions are – here’s a guide I wrote for this precise kind of query where a helper function is used to build a GROQ query dynamically.
If there’s any part of working with Sanity Studio, Sanity Client, or any of the APIs where you’ve got it working but aren’t quite convinced you’re doing it right, please let me know!
Some more opinionated reading that unpack opinionated guides or best practices for other parts of the Sanity ecosystem:
Sanity Composable Content Cloud is the headless CMS that gives you (and your team) a content backend to drive websites and applications with modern tooling. It offers a real-time editing environment for content creators that’s easy to configure but designed to be customized with JavaScript and React when needed. With the hosted document store, you query content freely and easily integrate with any framework or data source to distribute and enrich content.
Sanity scales from weekend projects to enterprise needs and is used by companies like Puma, AT&T, Burger King, Tata, and Figma.
It can be useful for testing plugins, front ends, or other integrations to have a Sanity Studio populated with fake content.

Setup interactive live preview with Presentation in a Next.js app router application


Summarise form progression by decorating the entire editing form for a document with a component loaded at the root level.
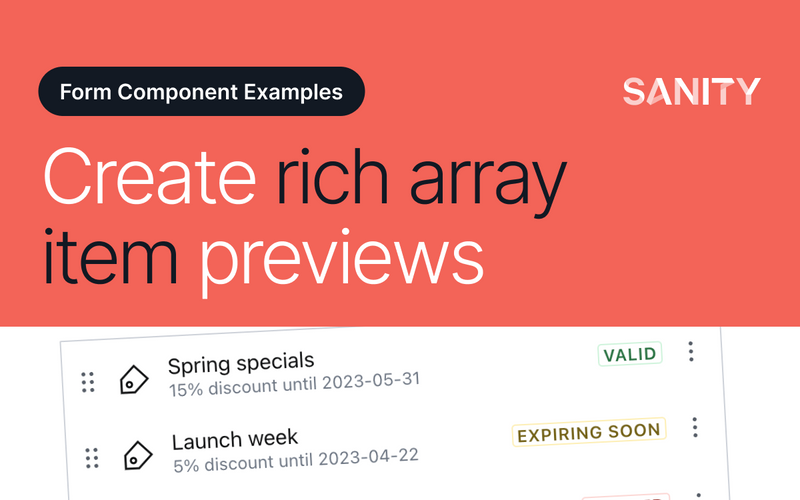
Object types use a preview property to display contextual information about an item when they are inside of an array; customizing the preview component can make them even more useful for content creators.