An opinionated guide to Sanity Studio
Official(made by Sanity team)
Sanity Studio is an incredibly flexible tool with near limitless customisation. Here's how I use it.

Simeon Griggs
With Sanity, you’re in complete control of building an infrastructure for distributed teams to author content within customized boundaries. Individual authors may cross – or be limited to – teams, brands, environments, or markets. Each set of content can be cross-referenced so that queries are resolved from sources of truth rather than individual silos that grow stale over time.
Depending on who you ask, multi-tenancy can be interpreted differently.
For this guide, we’ve used it to describe an implementation required when the need to author structured content goes beyond a single team, stored in distinct locations, and edited by multiple authors with differing roles.
This gets more complex when members of these teams share some responsibilities across data sources, or those sources need to create relationships between that data.
This guide will use an imagined, rapidly growing travel company as an example.
This setup can be configured in Sanity; however, before showing how it’s helpful to outline some of the names used to configure a successful build.
Through this guide you’ll work through achieving the following outcomes in a Sanity implementation:
To understand how best to divide work among teams, you might first like to orient yourself with the names we give to different parts of the Sanity platform.
See the Platform terminology page in our documentation.
Now you're familiar with organizations, projects, datasets and members – let's proceed.
The following guide will walk through each step of a successful multi-tenant setup. You may do this in an existing project or create a new one, following the documentation on creating a new one.
You may consider running multiple projects for your implementation. This creates a complete separation of members and project configuration between your teams. Also, it prevents those configurations and the content inside datasets from colliding. However, it prevents referenced content, and any common settings must be manually duplicated.
For simplicity in this guide, you’ll use one project.
In a one-project, multi-team setup, be aware of administrator-level members’ power. They will have access to all project-level settings, such as tokens and webhooks. All members tasked only with content creation should have their permissions scoped to remove access to these settings. This is covered later in the guide.
From this point forward, the guide implements some features only available on specific plans and a volume of datasets which will require setting up billing for your organization. The following cannot be completed on the free plan without incurring overages. See “Alternatives” at the end of this guide. Or request a product demo for more information.
Goal: Two content teams that require Development and Production environments operate in individual markets – Norway and the USA. Create unique data storage for these teams.
Our growing travel company currently authors content related to hotels and operates in two markets: USA and Norway.

Create a dataset for each team, market, and environment. These indicators are written directly into the dataset names.
hotels_us_productionhotels_us_developmenthotels_no_productionhotels_no_developmentThe consistent naming convention here of team_market_environment is essential, as you’ll see in the code snippets further in this guide.
Note: All datasets are created equal! There’s no functional difference between any two datasets in a project.
Datasets can be created in the project management interface or using the Sanity CLI.
By default, datasets have public visibility. Anyone – member or guest – can query the dataset for published documents.
Since you’ll be restricting access with member roles, ensure each dataset is private. This will require authentication to query the dataset and make it possible to hide specific published documents from specific roles.
Note that uploaded assets in the Content Lake are always public but can only be downloaded via an obfuscated, uniquely generated URL using a hashed filename. Downloading original image assets requires authentication.
When working with datasets as environments, it’s great to set up a deployment workflow early so that you can automatically validate schema and studio changes. Our guide on “Multi-environment deployments” demonstrates how.
Some teams find value in authoring content in a staging environment and migrating it into production. While not generally recommended, this provides more explicit boundaries between publicly available and “staged” content.
Before adopting this workflow, consider
Migrating data is not required to preview changes before publishing in production. Sanity provides tooling to render as-you-type live previews in your front end. See documentation for previews for more details, including implementation guides for Next.js and Remix.
Goal: Each market team requires a unique space to create content with the same structure. Some members will need visibility of all content, and so must be able to navigate between them.
Sanity Studio is an application that interfaces with APIs, projects, and datasets like any other application can. It can take multiple “Workspace” configurations in its sanity.config.ts file. Read more about workspaces in the docs.
By default, a new Studio contains just one workspace. Update your configuration file to an array of objects like the one below to create a workspace for each team and conditionally load the correct environment’s dataset.
// ./sanity.config.ts
import {defineConfig} from 'sanity'
import {deskTool} from 'sanity/desk'
import {visionTool} from '@sanity/vision'
import {schemaTypes} from './schemas'
const isProduction = process.env.NODE_ENV === 'production'
export const config = defineConfig([
{
name: 'hotels-us',
title: 'Hotels USA',
basePath: '/us'
projectId: 'your-project-id',
dataset: isProduction
? 'hotels_us_production'
: 'hotels_us_development'
plugins: [deskTool(), visionTool()],
schema: {
types: schemaTypes,
},
},
{
name: 'hotels-no',
title: 'Hotels Norway',
basePath: '/no'
projectId: 'your-project-id',
dataset: isProduction
? 'hotels_no_production'
: 'hotels_no_development'
plugins: [deskTool(), visionTool()],
schema: {
types: schemaTypes,
},
}
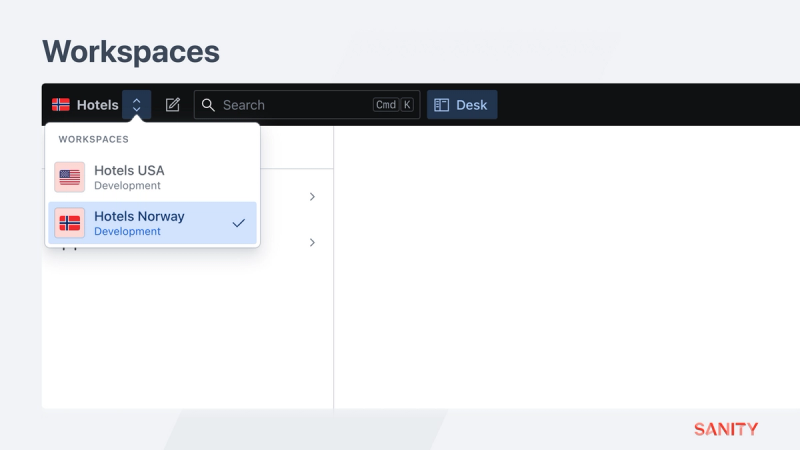
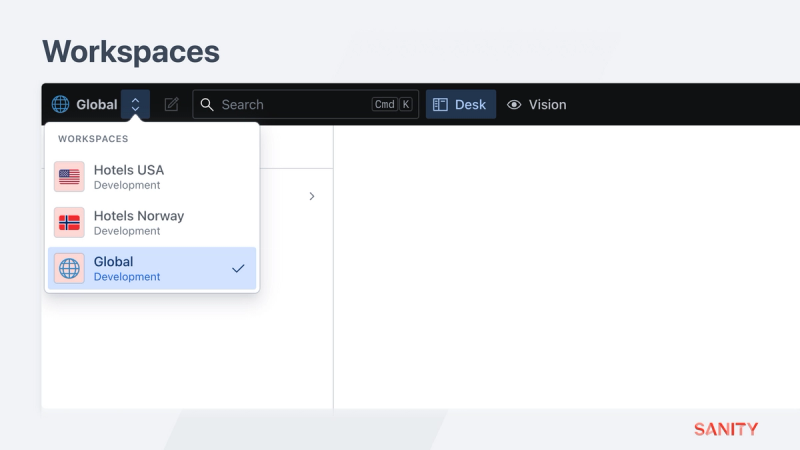
])Your Studio should now display a drop-down menu in the top left corner to switch between workspaces.
You can configure each workspace uniquely. For example, a schema type or plugin loaded in one workspace might not be required in another.
Deploy the Studio now to see it targeting the development datasets locally and where deployed targeting production.
This guide will not dictate which document schema types to use. However, ensure at least an “article” type schema so it’s possible to implement member roles later.
Goal: One market’s authors need to create unique content from all others. Load different schema configurations based on the current dataset.
Now that multiple workspaces use the same schema, individual teams in different markets create content with the same structure because they use the same Studio. This will require organizational alignment to maintain the integrity of the implementation. Consider that if one team adds a new schema or updates a field definition – both teams will receive those updates.
Currently, the schema key in our sanity.config.ts file is a static array. Changing that to a function allows you to intercept all registered schema and modify the result using the context of this workspace and member.
In the code snippet below, all markets other than the “US” use a common schema. The “US” team has specific schema types that need registering and are spread into the array.
Notice how you can target the team, market, and environment based on the name of the workspace’s dataset.
// ./sanity.config.ts

schema: {
  types: (prev, context) => {
    // Expected dataset name structure is "hotels_us_production"
    const [team, market, environment] = context.dataset.split('_')

    // Return defaults for all markets other than the "us"
    if (market !== 'us') {
      return [...prev, ...schemaTypes]
    }

    // Spread "us" specific schema into this workspace
    return [...prev, ...usSchemaTypes, ...schemaTypes]
  },
},
Since the context parameter will always contain this workspace’s targeted dataset, this code could be extracted into a helper function and re-used in each of the workspace configurations.
Other parts of the configuration share access to the workspace’s configuration and can filter what is loaded, such as tools and document.actions.
The plugins key does not have the same context parameter but may still be loaded differently in each workspace. For example:
// ./sanity.config.ts

const pluginsGlobal = [deskTool(), visionTool()]
const pluginsNo = [dashboardTool()]

export default defineConfig([
  // ...other workspaces
  {
    name: 'hotels-no',
    // ...other settings

    plugins: [...pluginsGlobal, ...pluginsNo],
  },
])Goal: Hide or lock individual fields for members based on their role, market, or the current Studio workspace environment.
With schema shared across teams and environments, individual fields in schema types may require unique validation and hidden and read-only settings.
In this example, a slug field is only required in production datasets.
You can access the current dataset name from the Sanity client through the context parameter. Once you have the dataset name, you have this workspace’s team, market, and environment, thanks to the naming convention. Below is an example of a field validation rule only applied when a content creator is in a production environment:
defineField({
  name: 'slug',
  type: 'slug',
  validation: (rule) =>
  rule.custom((value, context) => {
    // Valid if the slug field has a value
    if (value) {
    return true
    }

    // The dataset is extracted from the client from this "context"
    const {dataset} = context.getClient({apiVersion: '2021-03-25'}).config()

    // Expected dataset name structure is "hotels_us_production"
    const [team, market, environment] = dataset?.split('_') || []

    return environment === 'production'
      ? 'A slug is required to generate a page on this website'
      : true
  }),
})
Both hidden and readOnly properties on fields can also be customized with a function in a similar way.
Goal: Scope members’ permissions to specific document types, environments, or markets. Create a member role for authors that can only Publish “article” documents for the Norway team.
Now that you have datasets to separate teams, you’ll need member roles and resources to gate their access to only the content they are responsible for.
Permissions are scoped by the value of a field in a document and can be duplicated across datasets for easy reuse.
They are applied by both:
Read more about access control in the docs.
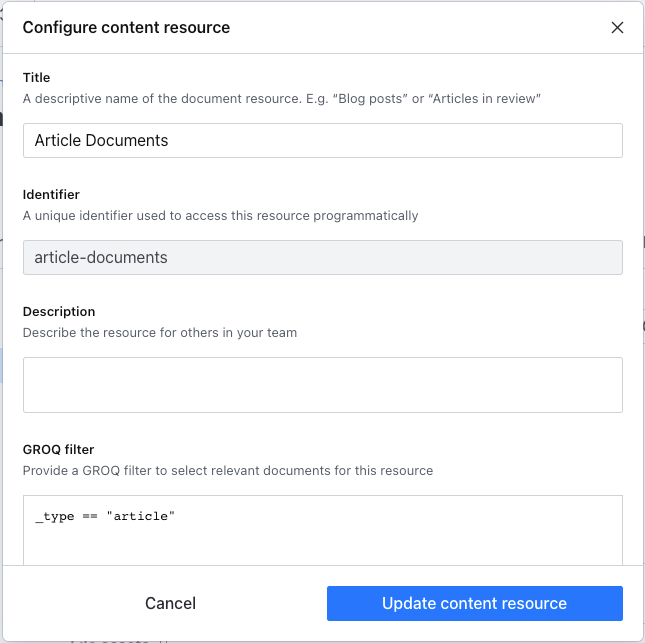
Before creating a role, you’ll need to create a resource to define a set of content to which permissions will apply. Inside Access > Resources, create a new content resource called “Article Documents” with a GROQ filter:
_type == "article"GROQ is a query language for JSON that is used in Sanity to query documents, configure webhooks, and define content resources. Find out more in the documentation.
Now inside Access > Roles, create a new “Norway Article Author” role.
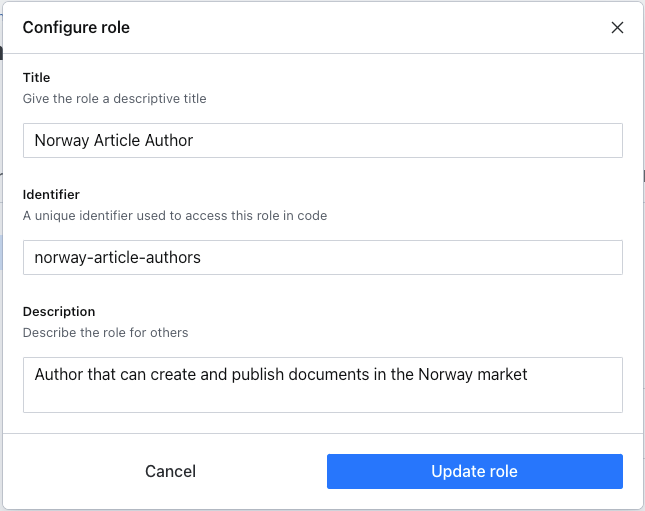
Note that permissions are “additive.” So if a member with two roles – one that only allows “read” and another that allows “create” – will be able to “create.”
Now, apply permissions to documents based on the dataset. Configured like the example below, on just these two datasets, a member with this role can:
_type == “article”_type == “article”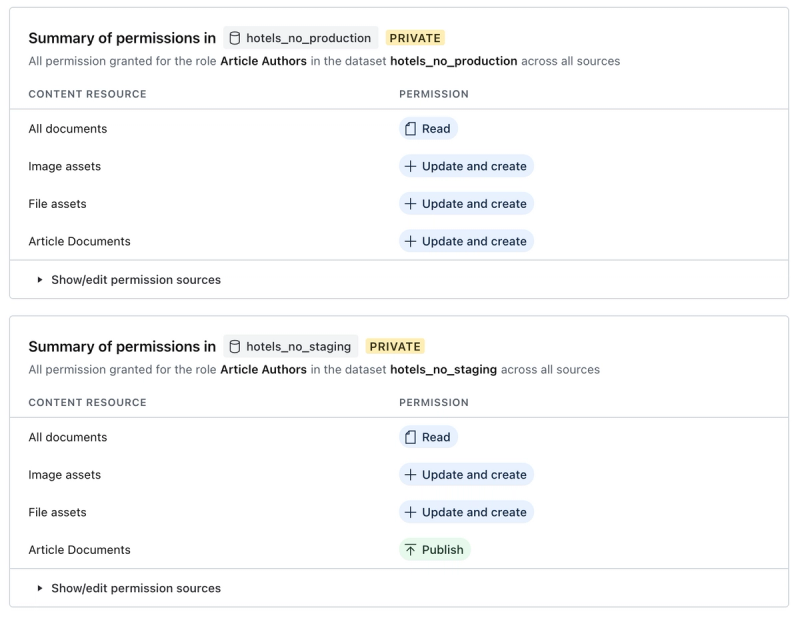
You may wish to be more granular with these member roles and create one for each market.
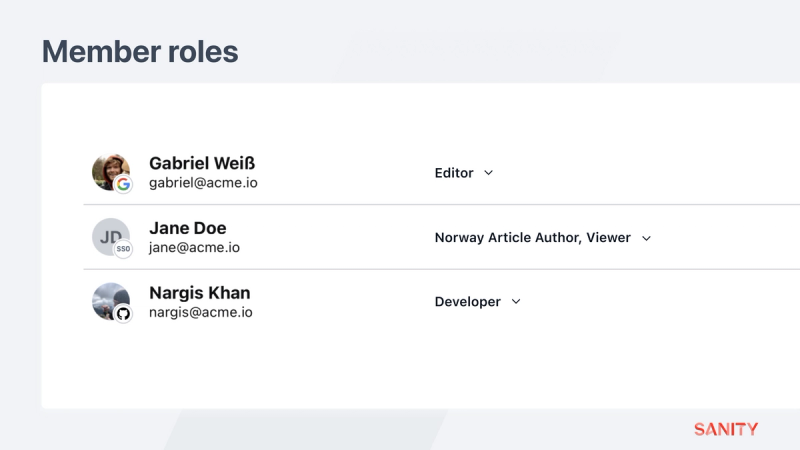
Create a member account, only assign this “Norway Article Author” role, and look through the studio in the local development and deployed production environments.
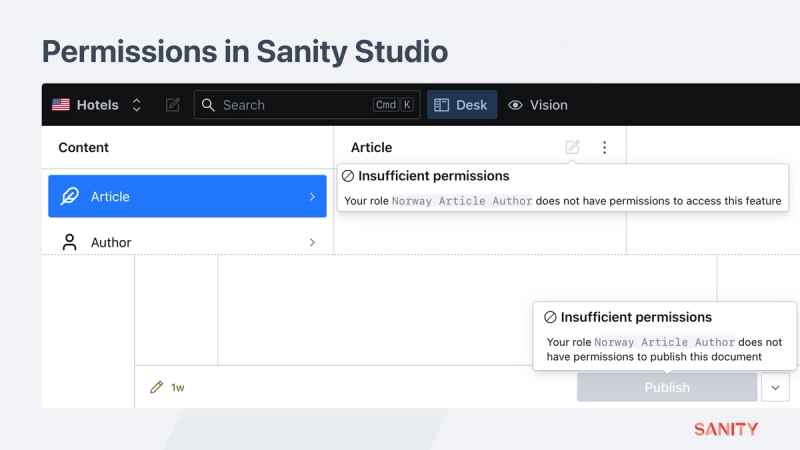
Members can stack roles to gain more permissions. The built-in role of “Viewer” is helpful to apply to a member to get read-only permissions across all datasets for documents and assets.
Assign this author the “Viewer” role and see how they can now browse through all other document types in all workspaces.
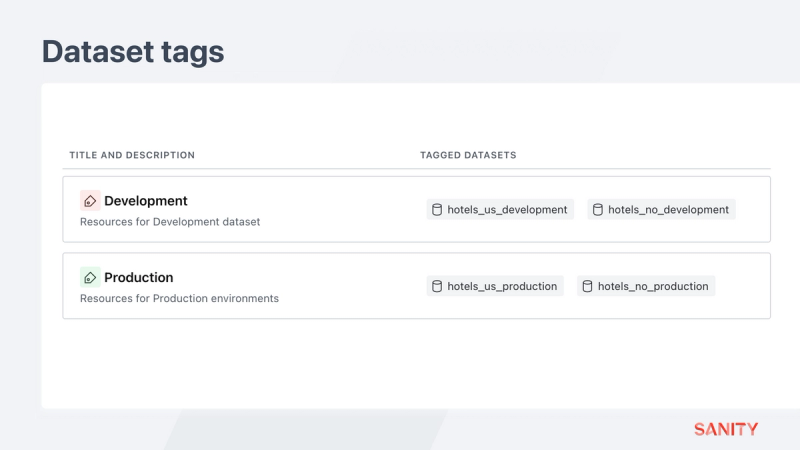
Each dataset can be given a “tag” to simplify spreading permissions across multiple datasets. Instead of applying permissions to individual datasets, you might apply them to a tag, and all matching datasets will receive those permissions.
Create two tags by going to Datasets > Tags in your project’s settings and then apply them to the four datasets. The colors used here are purely for visual effect and have no functional difference.
You could now apply a content resource to all production datasets differently than all development datasets – without configuring them individually.
Goal: As new teams are added to the platform, create a source of truth that all teams can reference.
References in Sanity bind documents together. For example, an article document can reference an author document.
A query for that article can follow the reference to retrieve the author document’s content.
Likewise, a query for an author document can return all article documents that reference it.
Typically these documents reference documents in the same dataset. In a multi-tenant implementation, there’s excellent value in teams being able to reference one another’s content – or both teams referencing the same content.
Imagine our fledgling travel company is planning to launch an app and website for flights. Repeating the steps above, you would create new datasets, workspaces, member roles, and resources for those content creation teams.
When teams create content for the same organization, some shared content is best created in – and referenced from – a single source of truth. This is where cross-dataset references are helpful.
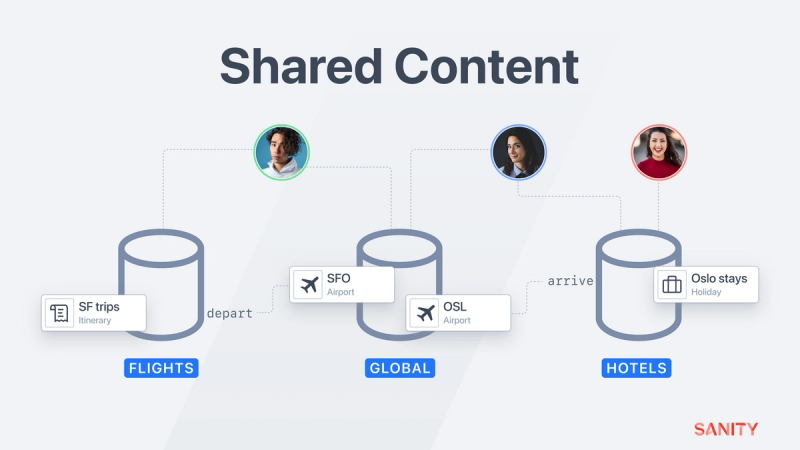
In your project settings, create a pair of private datasets for this shared, globally relevant content for each environment:
global_developmentglobal_productionIn your Studio configuration, add a new workspace for this global content:
// ./sanity.config.ts

// Import a second set of schema types for this new workspace
import {globalSchemaTypes, schemaTypes} from './schemas'

// ... all other imports

export default defineConfig([
  // ... all other workspaces
  {
    name: 'global',
    title: 'Global',
    basePath: '/global',
    projectId: 'your-project-id',
    dataset: process.env.NODE_ENV === 'production' ? 'global_production' : 'global_development',
    plugins: [deskTool(), visionTool()],
    schema: {
      types: globalSchemaTypes,
    },
  },
])
Notice how this workspace imports a different set of schema types. You will need to create this additional array of document schema. For this example, the global workspace has just one document schema airport, with a code and image fields.
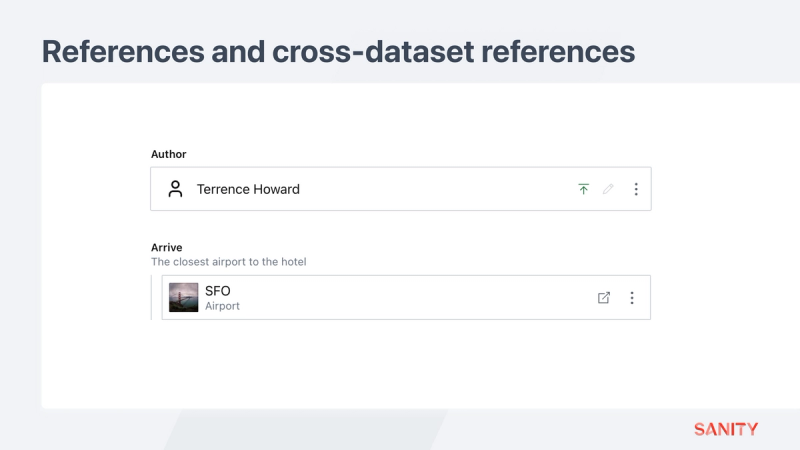
Now in the schema types used by the hotel and flight teams, add a new field for a cross-dataset reference that targets this new global dataset.
// In one of the document schema files for the hotel and flight teams

defineField({
  name: 'arrive',
  description: 'The closest airport to the hotel',
  type: 'crossDatasetReference',
  dataset: process.env.NODE_ENV === 'production' ? 'global_production' : 'global_development',
  studioUrl: ({type, id}) => `/global/desk/intent/edit/id=${id};type=${type}/`,
  to: [
    {
      type: 'airport',
      preview: {
        select: {title: 'code', media: 'image'},
        prepare: ({title, media}) => ({title, subtitle: 'Airport'}),
      },
    },
  ],
}),
You can create references to the “global” dataset when creating documents in any team or market-specific workspace.
Members with permission to edit these global documents will ensure that all downstream consumers have the most up-to-date version.
This is not the only way to create a multi-tenant setup in Sanity! The platform's flexibility allows you to divert from this guide in whichever way you feel more accurately suits your goals.
If both your content authoring teams and frontend developer teams are entirely separate, it may be worth separating your content across projects. In such instances, referencing content across datasets and easily duplicating project-level configuration may be less valuable. More transparent, complete lines of separation between authors and datasets could be more useful.
Another example is to author multiple markets of content within the same Dataset.
This approach requires a more explicit configuration of member roles, Studio schema, and how you query content with GROQ.
To make this work, every document must have a field like market, and your Studio should contain a workspace for each unique market. Within each workspace, desk lists and reference fields must be filtered down to just this document’s markets.
Using initial values and initial value templates, you can ensure every new document begins with the correct market field value. It’s also helpful to add filters to reference fields so that authors do not accidentally create references between markets.
It is possible to have unintended naming collisions or schema differences when multiple teams work inside one dataset. So extra care is required to maintain content integrity and frontend queries between teams.
However you choose to configure a Sanity implementation to spread work across teams, the ability to configuration of permissions and the authoring experience is entirely in your control.
As your teams and content needs grow, the multi-tenancy model you have created should be able to expand with it without the need to rebuild your setup completely.
Try out Sanity today with a new free project, contact sales for more details, or request a product demo.
Sanity Composable Content Cloud is the headless CMS that gives you (and your team) a content backend to drive websites and applications with modern tooling. It offers a real-time editing environment for content creators that’s easy to configure but designed to be customized with JavaScript and React when needed. With the hosted document store, you query content freely and easily integrate with any framework or data source to distribute and enrich content.
Sanity scales from weekend projects to enterprise needs and is used by companies like Puma, AT&T, Burger King, Tata, and Figma.
Sanity Studio is an incredibly flexible tool with near limitless customisation. Here's how I use it.

It can be useful for testing plugins, front ends, or other integrations to have a Sanity Studio populated with fake content.
Setup interactive live preview with Presentation in a Next.js app router application


Summarise form progression by decorating the entire editing form for a document with a component loaded at the root level.