Create a time duration object field
Delight your content creators with intelligent inputs for more complex data structures
This developer guide was contributed by Simeon Griggs (Principal Educator).
Delight your content creators with intelligent inputs for more complex data structures
What you need to know:
This guide assumes that you know how to set up and configure a Sanity Studio and have basic knowledge about defining a schema with document and field types. Basic knowledge of React and TypeScript is also useful, although you should be able to copy-paste the example code to get a runnable result.
Custom form components by example
One of Sanity Studio’s most powerful features is custom drop-in replacements for form fields. This guide is one in a series of code examples.
You can get more familiar with the Form Components API in the documentation.
- Create a “coupon generator” string field input
- Create a visual string selector field input
- Create a survey rating number field input
- Create a time duration object field
- Create an array input field with selectable templates
- Create interactive array items for featured elements
- Create richer array item previews
- Create a document form progress component
What you’ll be making
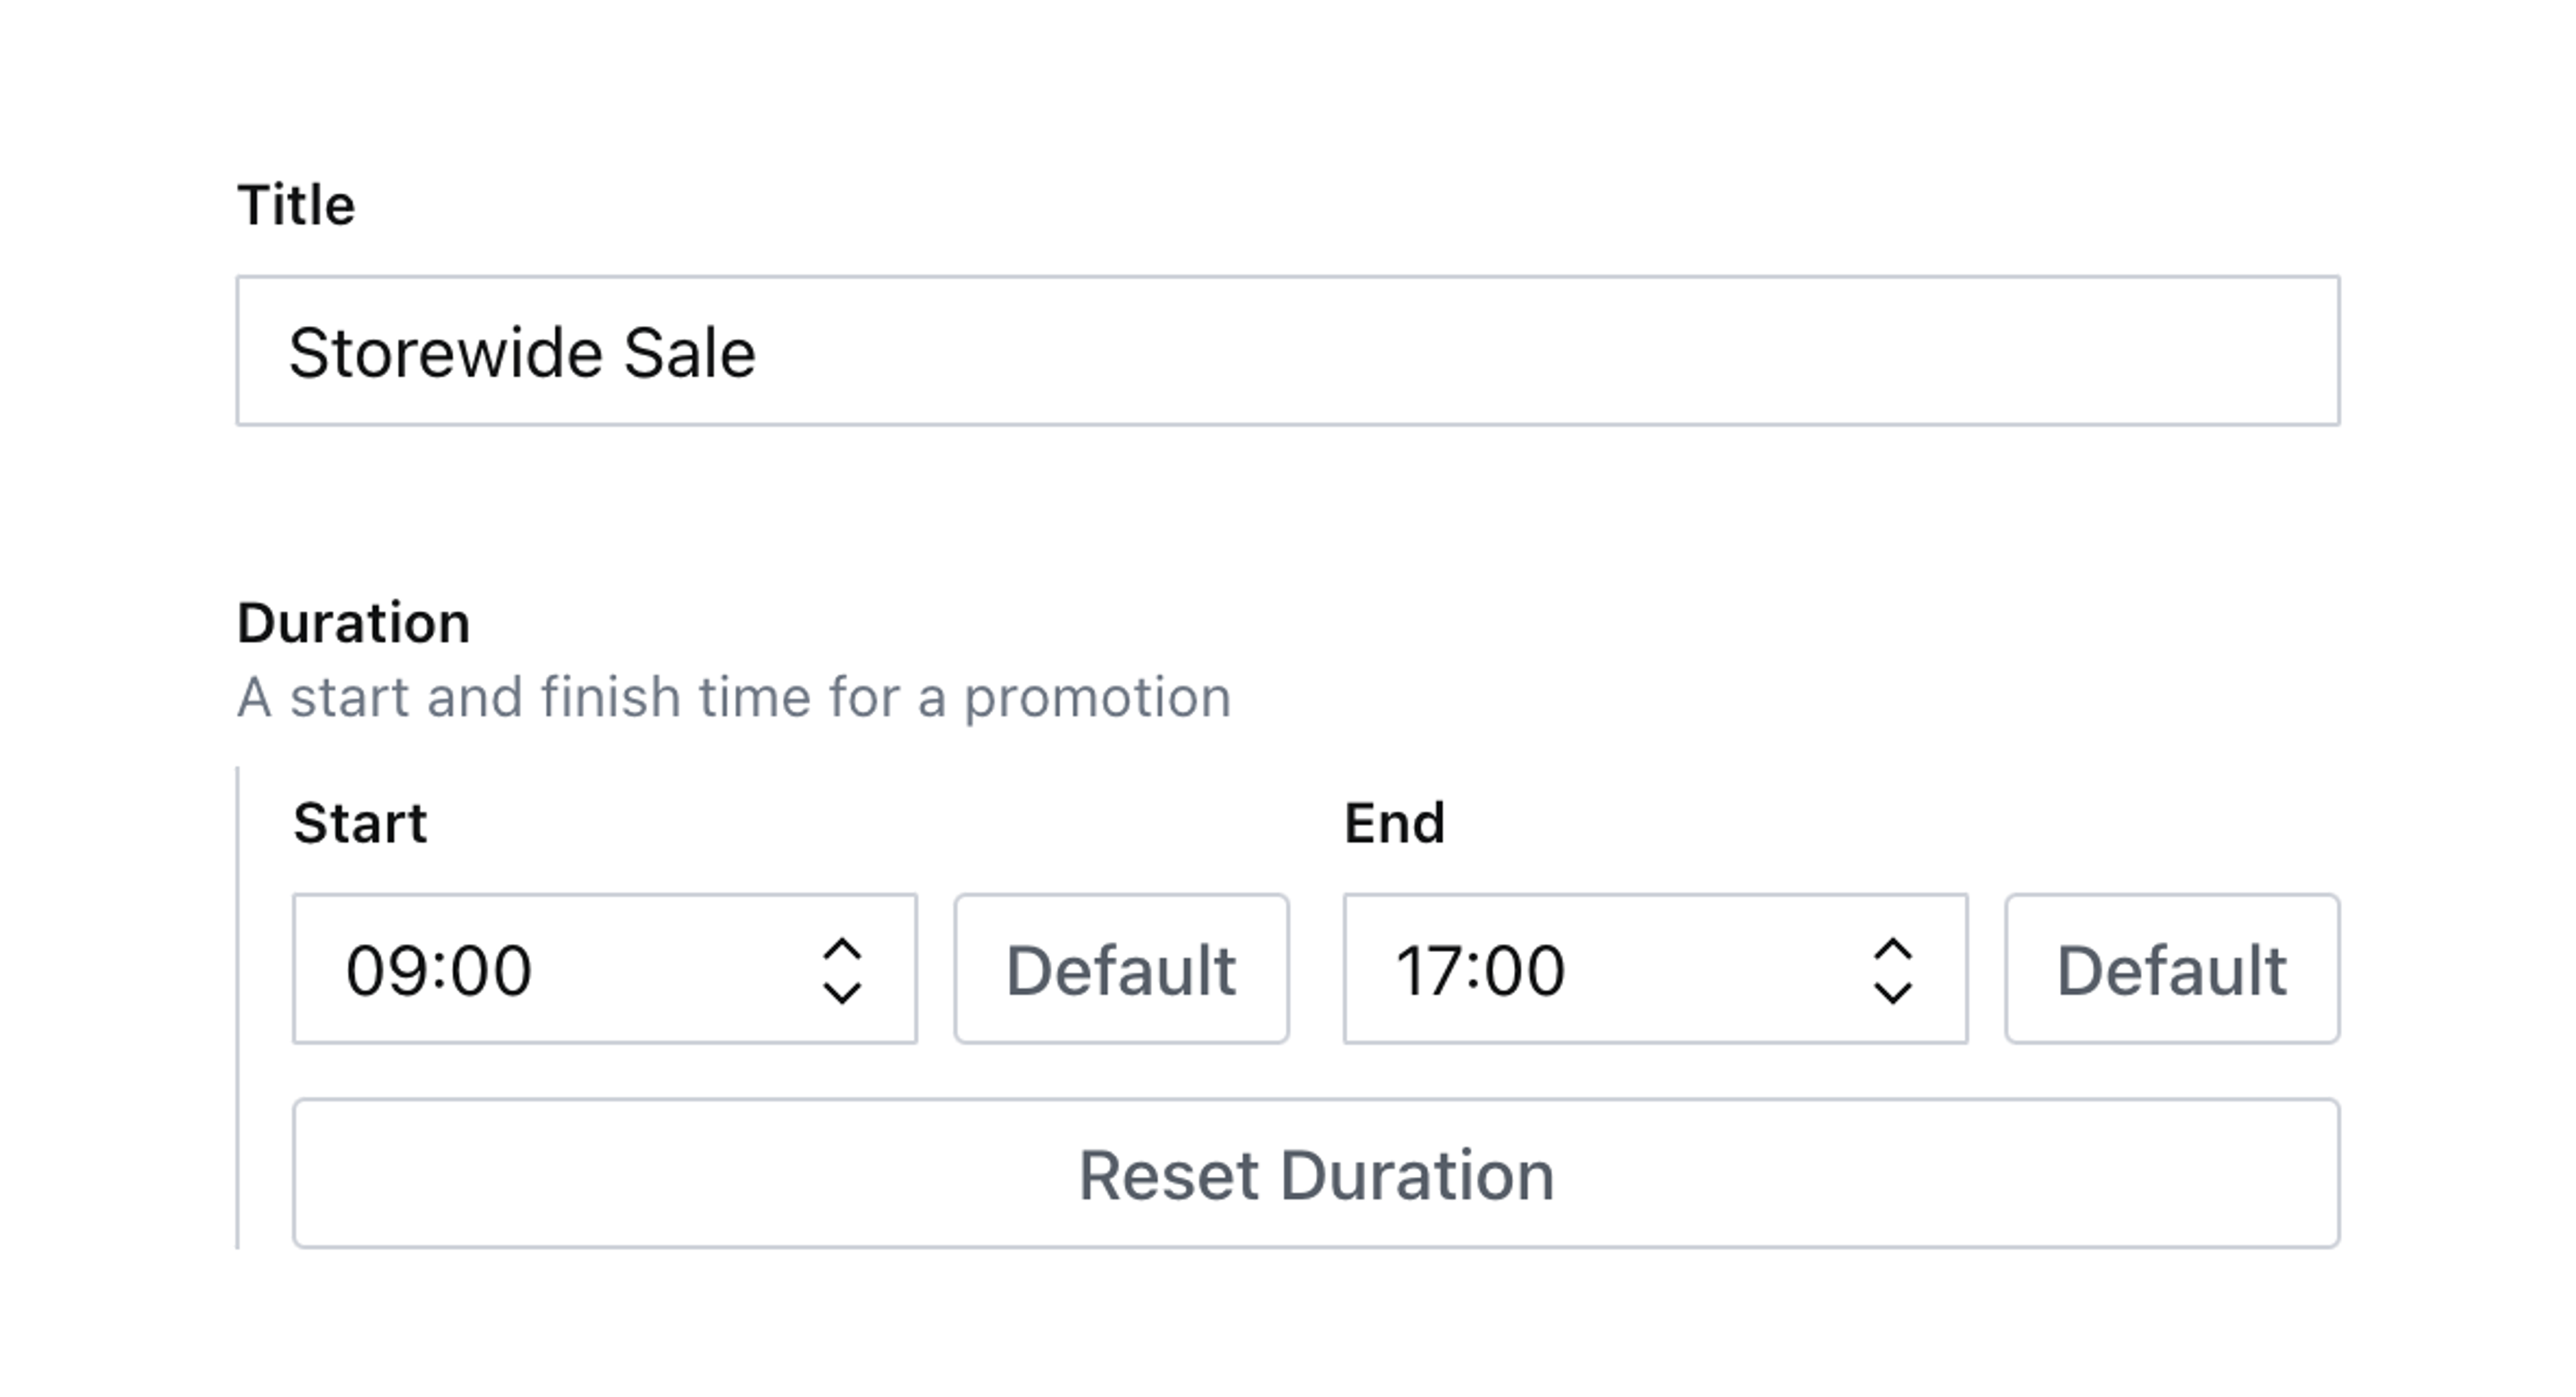
An object with two string fields for time, with a custom input that allows you to reset one or all fields back to a default value.
Get started
In this guide, you’ll create a duration object type with two fields: a start and finish time. Times will be selected from a list of predefined options. You’ll also learn how to use paths to make fine-grained updates to object fields without replacing the entire object value.
Create the following schema files in your Studio and register them to the schema in sanity.config.ts
First, you’ll need to register a field to select the time:
// ./schema/duration/timeValueType.ts

import {defineType} from 'sanity'

export const timeValueType = defineType({
  name: 'timeValue',
  title: 'Time',
  type: 'string',
  options: {
    list: ALLOWED_TIMES(),
  },
})

// A function that generates an array of times from 00:00 to 23:30
export function ALLOWED_TIMES() {
  const times = []
  for (let h = 0; h < 24; h++) {
    for (let m = 0; m < 60; m += 30) {
      times.push(`${h.toString().padStart(2, '0')}:${m.toString().padStart(2, '0')}`)
    }
  }
  return times
}
Next, a duration field which is an object with start and finish values:
// ./schema/duration/durationType.ts

import {defineField, defineType} from 'sanity'

export const durationType = defineType({
  name: 'duration',
  title: 'Duration',
  description: 'A start and finish time for a promotion',
  type: 'object',
  fields: [
    defineField({
      name: 'start',
      type: 'timeValue',
    }),
    defineField({
      name: 'end',
      type: 'timeValue',
    }),
  ],
  // make the fields render next to each other
  options: {columns: 2},
})
Lastly, you’ll need a document schema type to render this custom field. The below example is a promotion document schema with a title and the duration field.
// ./schema/promotionType.ts

import {defineField, defineType} from 'sanity'

export const promotionType = defineType({
  name: 'promotion',
  title: 'Promotion',
  type: 'document',
  fields: [
    defineField({
      name: 'title',
      type: 'string',
    }),
    defineField({
      name: 'duration',
      type: 'duration',
    }),
  ],
})
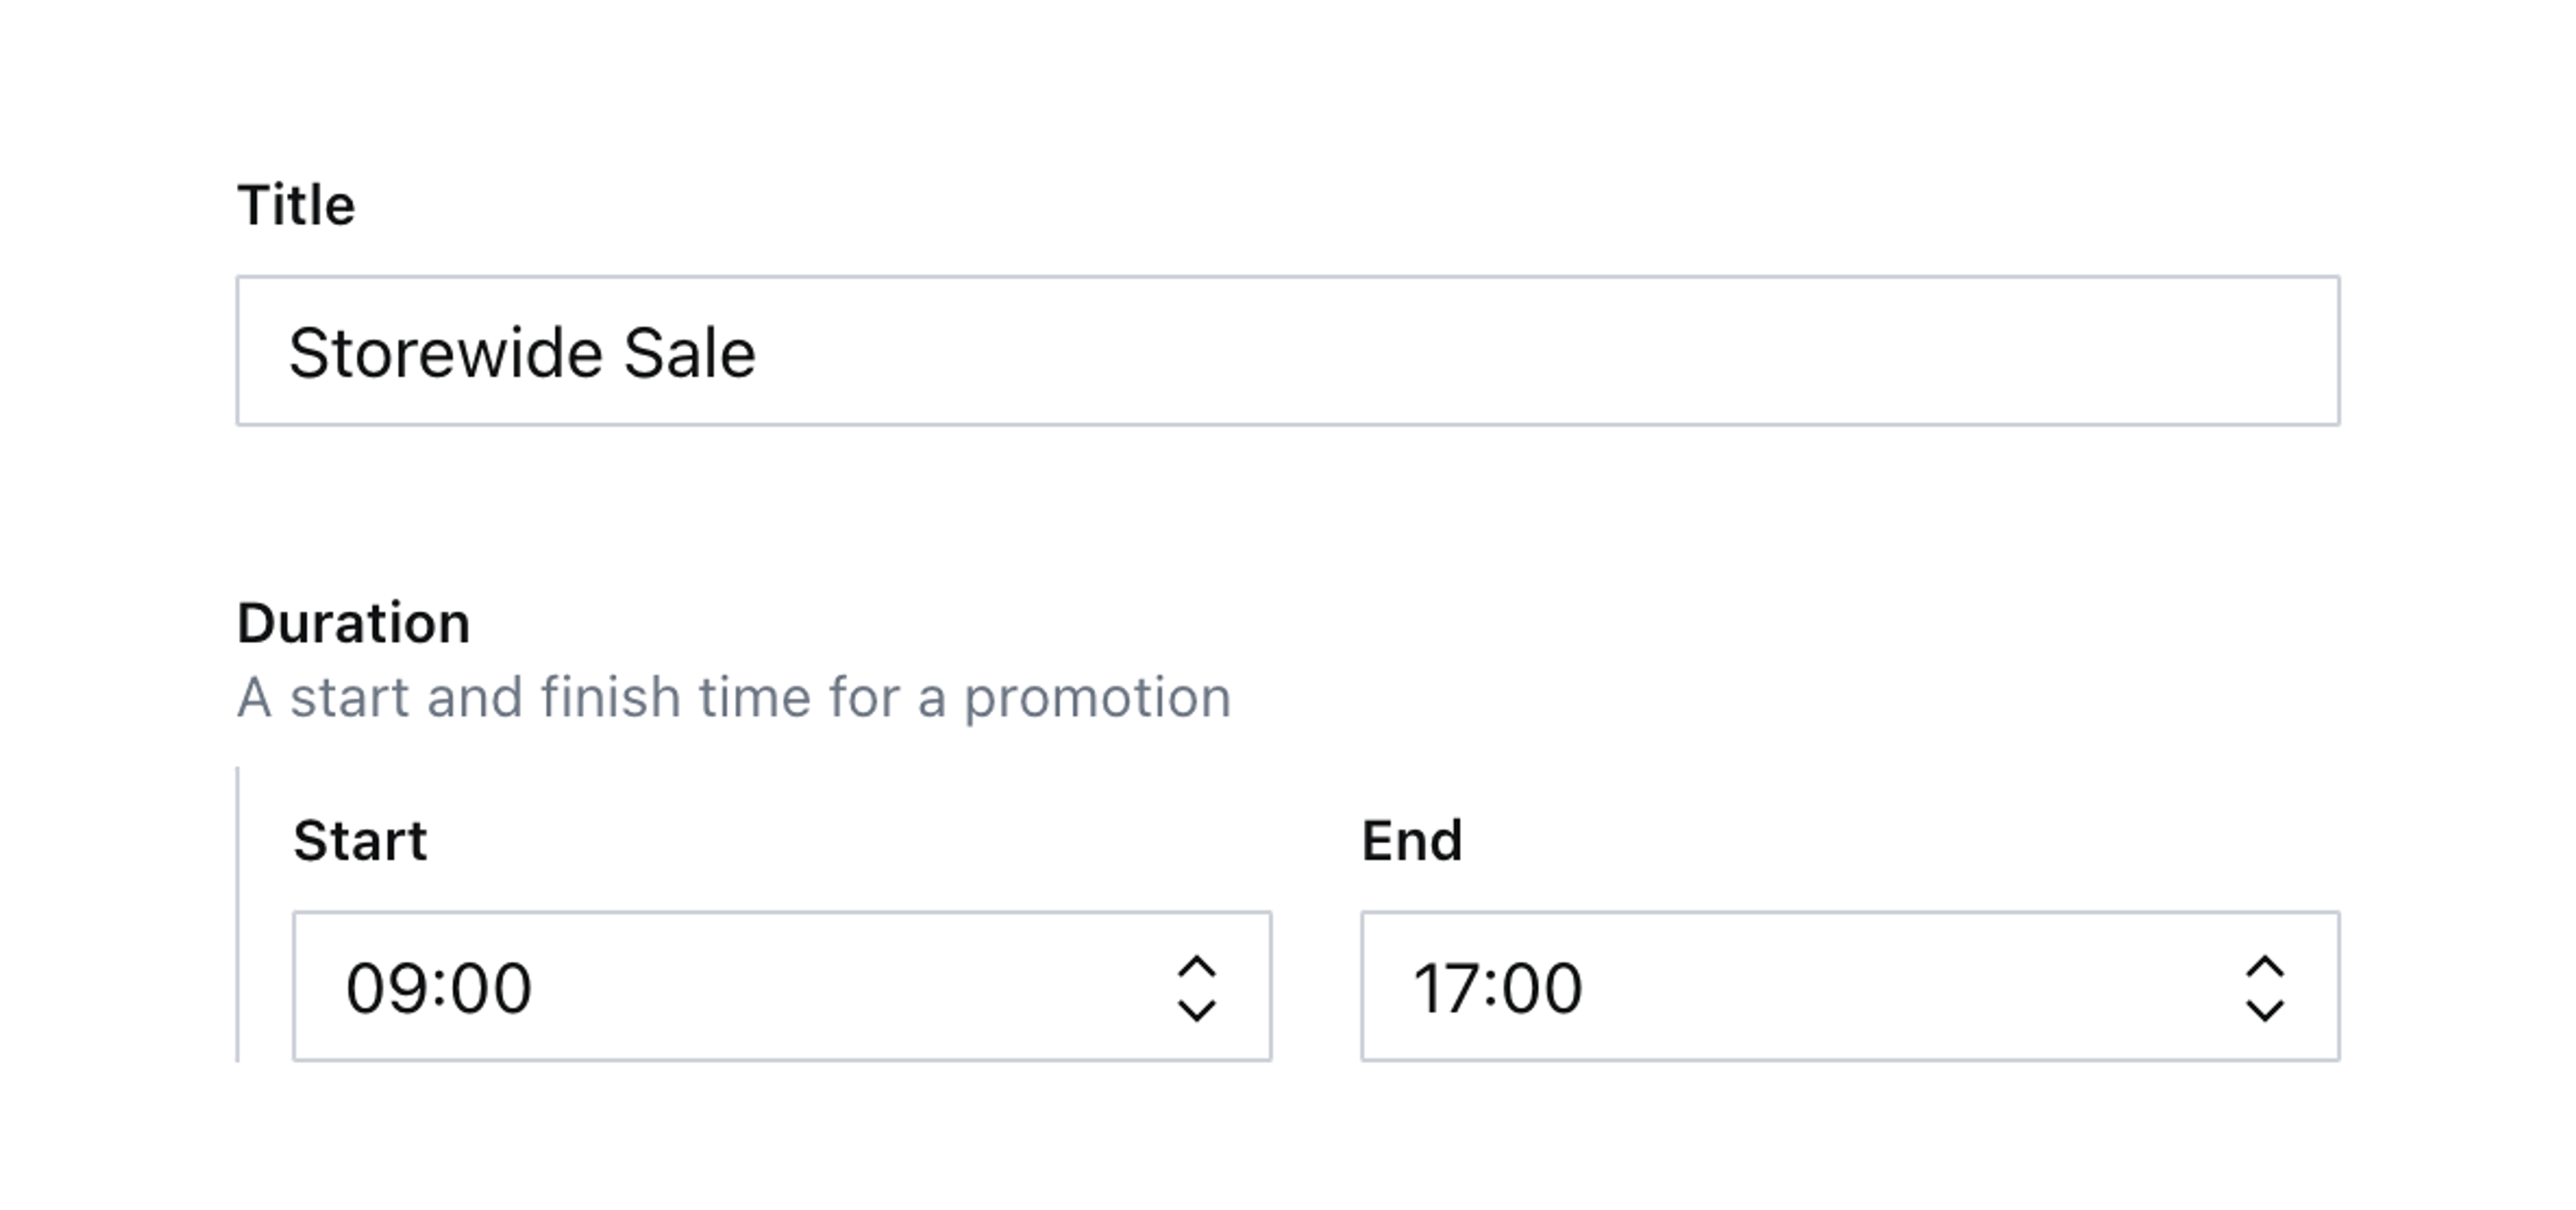
With these files created and the schema types registered, you should be able to create a new promotion document type and see the following fields:

Content creators can now create new documents with some valid values. However, it’s not visually interesting. It’s not possible to remove values. You could set an initial value on the field but cannot “reset” those values.
Create a custom duration input
More complex field structures mean slightly more complex custom inputs.
Create the component as shown below. Note that this field type’s props are now a generic, which can take the object's value.
Also, to render the object's fields individually, you cannot use props.renderDefault as that would render the entire object. Instead, search for the member you want to display and use the ObjectInputMember component.
The benefit of using this component and passing along props is that if any child fields also use custom inputs – they’ll still be used. You’re not overwriting the tree of customizations.
// ./schema/duration/DurationInput.tsx

import {Box, Stack, Button, Flex, Grid} from '@sanity/ui'
import {ObjectInputMember, ObjectInputProps} from 'sanity'

type DurationValue = {
  _type?: 'duration'
  start?: number
  end?: number
}

export function DurationInput(props: ObjectInputProps<DurationValue>) {
  const {members} = props

  const startMember = members.find((member) => member.kind === 'field' && member.name === 'start')
  const endMember = members.find((member) => member.kind === 'field' && member.name === 'end')

  if (!startMember || !endMember) {
    console.error(`Missing "start" or "end" member in DurationInput: "${props.schemaType.name}"`)
    return props.renderDefault(props)
  }

  // Pass along functions to each member so that it knows how to render
  const renderProps = {
    renderField: props.renderField,
    renderInput: props.renderInput,
    renderItem: props.renderItem,
    renderPreview: props.renderPreview,
  }

  return (
    <Stack space={3}>
      <Grid columns={2} gap={3}>
        <Flex align="flex-end" gap={2}>
          <Box flex={1}>
            <ObjectInputMember member={startMember} {...renderProps} />
          </Box>
          <Button mode="ghost" text="Reset" />
        </Flex>
        <Flex align="flex-end" gap={2}>
          <Box flex={1}>
            <ObjectInputMember member={endMember} {...renderProps} />
          </Box>
          <Button mode="ghost" text="Reset" />
        </Flex>
      </Grid>
      <Button text="Default Duration" mode="ghost" />
    </Stack>
  )
}
With this created, next you’ll assign it to the duration object:
// ./schema/duration/durationType.ts

import {defineField, defineType} from 'sanity'
import {DurationInput} from './DurationInput'

export const durationType = defineType({
  // ...all other settings
  components: {input: DurationInput},
})
Create a new promotion document, and you’ll see the updated object input with new buttons. Clicking those buttons won’t write anything, so you must change that next.

Handling changes
You’ll need to access the onChange function from the component’s props to write patches to the document.
This function wraps any patch – such as setting or unsetting the value of a field – and ensures the rest of the Studio stays up to date with changes.
When working with forms in React, you’re often recommended to store values in a component’s state. This is an anti-pattern working with Sanity Studio input components. Writing content to state is only reflected in the browser of the person using the input. By using Sanity’s real-time APIs you allow content creators to collaborate and avoid overwriting each other’s changes by always syncing directly to the Content Lake.
When customizing primitive input field components (like string, number, etc) you’re only updating the value of that field.
You can replace the entire field value working with objects or arrays, but it is cleaner to “surgically” update individual fields.
In the updated code below, the buttons have been given onClick handlers can either update the entire object when the “Default Duration” button is clicked. Or update a single field when either of the “Reset” buttons are clicked.
How these work is explained in more detail below.
// ./schema/duration/DurationInput.tsx

import {Box, Stack, Button, Flex, Grid} from '@sanity/ui'
import {ObjectInputMember, ObjectInputProps, set} from 'sanity'
import {useCallback} from 'react'

type DurationValue = {
  _type?: 'duration'
  start?: number
  end?: number
}

const DEFAULT_START = '09:00'
const DEFAULT_END = '17:00'

export function DurationInput(props: ObjectInputProps<DurationValue>) {
  const {onChange, members} = props

  const handleChange = useCallback(
    (event: React.MouseEvent<HTMLButtonElement>) => {
      const {name, value} = event.currentTarget

      if (name === 'reset') {
        // Reset the entire object with default values
        onChange(
          set({
            _type: 'duration',
            start: DEFAULT_START,
            end: DEFAULT_END,
          })
        )
      } else if (name === 'start' || name === 'end') {
        // Set the "_type" field if it's not already set
        // Update only the "start" or "end" field value
        // The second parameter is a "Path" to the field from the root object
        const patches =
          props?.value?._type === 'duration'
            ? [set(value, [name])]
            : [set('duration', ['_type']), set(value, [name])]

        onChange(patches)
      }
    },
    [onChange, props.value?._type]
  )

  const startMember = members.find((member) => member.kind === 'field' && member.name === 'start')
  const endMember = members.find((member) => member.kind === 'field' && member.name === 'end')

  if (!startMember || !endMember) {
    console.error(`Missing "start" or "end" member in DurationInput: "${props.schemaType.name}"`)
    return props.renderDefault(props)
  }

  // Pass along functions to each member so that it knows how to render
  const renderProps = {
    renderField: props.renderField,
    renderInput: props.renderInput,
    renderItem: props.renderItem,
    renderPreview: props.renderPreview,
  }

  return (
    <Stack space={3}>
      <Grid columns={2} gap={3}>
        <Flex align="flex-end" gap={2}>
          <Box flex={1}>
            <ObjectInputMember member={startMember} {...renderProps} />
          </Box>
          <Button
            mode="ghost"
            text="Default"
            name="start"
            value={DEFAULT_START}
            onClick={handleChange}
          />
        </Flex>
        <Flex align="flex-end" gap={2}>
          <Box flex={1}>
            <ObjectInputMember member={endMember} {...renderProps} />
          </Box>
          <Button
            mode="ghost"
            text="Default"
            name="end"
            value={DEFAULT_END}
            onClick={handleChange}
          />
        </Flex>
      </Grid>
      <Button text="Reset Duration" mode="ghost" name="reset" onClick={handleChange} />
    </Stack>
  )
}
Using path to make fine-grained changes
Write updates to an individual field by supplying a path parameter to the set() function. The path is an array of any combination of strings, indexes, or key values to target the change. The root of the path is the object itself.
// This onChange handler...
onChange(set(value, [name]))

// ...is saying "set the 'start' field in the object to '09:00'"
// and leave other fields in the object unchanged
onChange(set('09:00', ['start']))
This works in the unset() function as well!
Now click the buttons on your custom input to see how they can change either the individual field or the entire object.
Next steps
- Add a validation rule to the
durationobject to ensure the end time is after the start time. - Or even better, add logic that makes end times before the start time unselectable (and vice-versa).
- Calculate the hours and minutes between the start and finish times and display the duration in plain text (or use something like
formatDurationfromdate-fns).
Dynamic folder structure using the currentUser and workflow states
NextLevel up Your Edit Modal with Next/Previous Navigation Buttons for Array Items
Was this page helpful?